GitHub Copilot CLI with managed identity: hub & spoke on Azure
I run GitHub Copilot CLI on Azure Virtual Desktop with the VM's managed identity and MCP servers to deploy a hub & spoke network on Azure.
Last updated on
Table of Contents
- The goal of the demo
- Step 1: the workstation’s managed identity
- Step 2: GitHub Copilot CLI and the MCP servers
- Step 3: hub & spoke in a few prompts
- Step 4: starting over with a DevOps mindset
- Not everything is perfect
- Why I like GitHub Copilot CLI
- More scenarios
- The bigger picture
- Key takeaways
- Watch the video and let’s talk
I keep playing with AI and with my Azure Virtual Desktop workstation dedicated to agents. This time the star is GitHub Copilot CLI: what it is, what you can do with it and why, in my opinion, it’s a much more interesting solution than Claude Code or its OpenAI counterpart, Codex. The scenario comes from my day-to-day work: testing an infrastructure for a customer by replicating their context in Azure.
The video with the full demo is coming soon to my YouTube channel.
The goal of the demo
To keep it simple, I asked GitHub Copilot CLI to build a hub & spoke network in a dedicated resource group, first directly and then with Template Specs and Azure Verified Modules. I’m starting from the workstation of the previous episode, the one running Hermes Agent.
Step 1: the workstation’s managed identity
The VM wrkst-ai-lt-0 has a system-assigned managed identity: an identity that represents the resource itself.
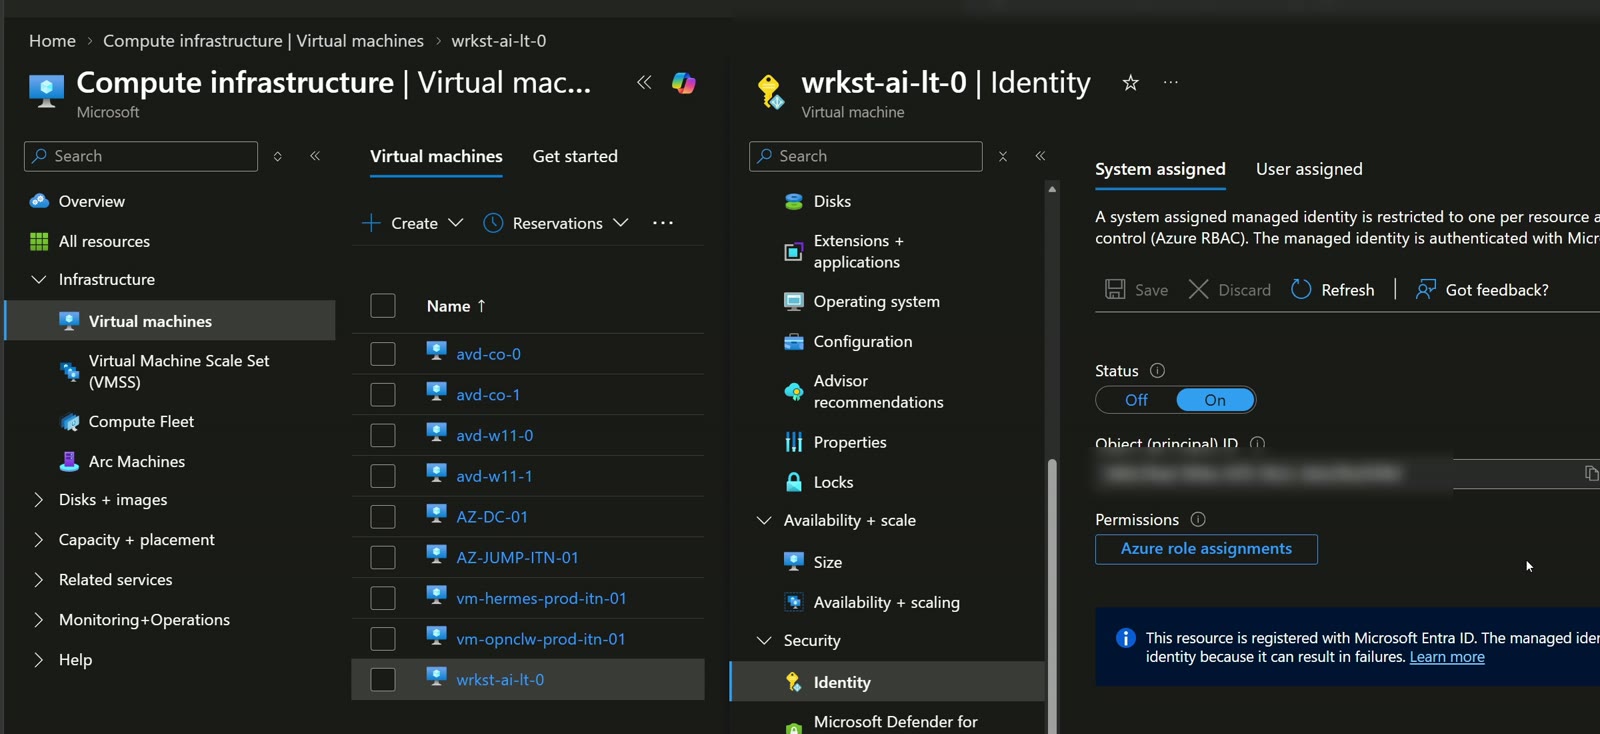
Next I picked a test resource group, rg-test-ai-itn-01, and from Access control (IAM) I assigned the VM’s identity the Contributor role. Keep in mind that Contributor is one of the privileged roles, which is exactly why I limit it to a single test resource group. If least privilege is your thing, I also covered it in my post on PIM and just-in-time managed groups.
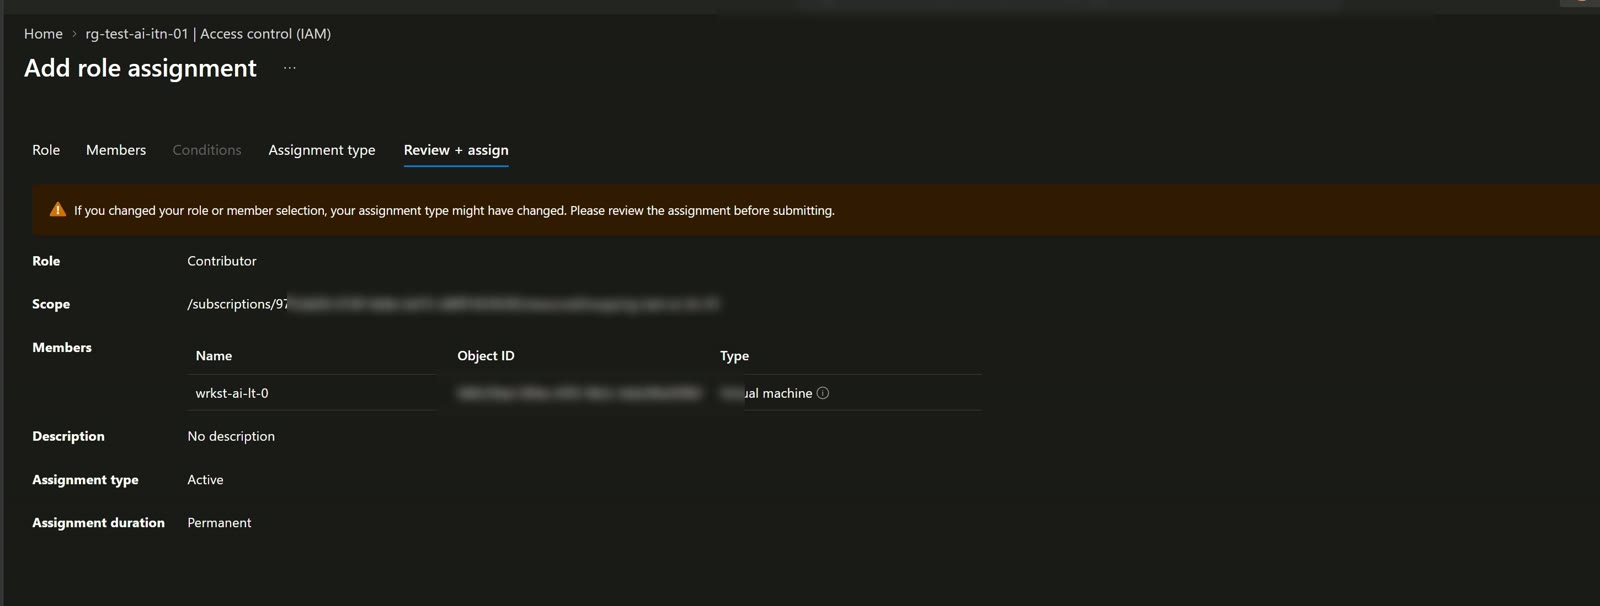
| Item | Value |
|---|---|
| Identity | System-assigned managed identity of VM wrkst-ai-lt-0 |
| Role | Contributor |
| Scope | Resource group rg-test-ai-itn-01 |
| Assignment type | Active, permanent |
| Environment | Test only |
Step 2: GitHub Copilot CLI and the MCP servers
I sign in to the VM, open PowerShell and type copilot.
I can resume a previous session or start a new one. In the session I’ve configured several MCP servers: for this demo the most interesting ones are the Azure one and the Microsoft Learn one, but there’s also the GitHub one, which comes in handy later.
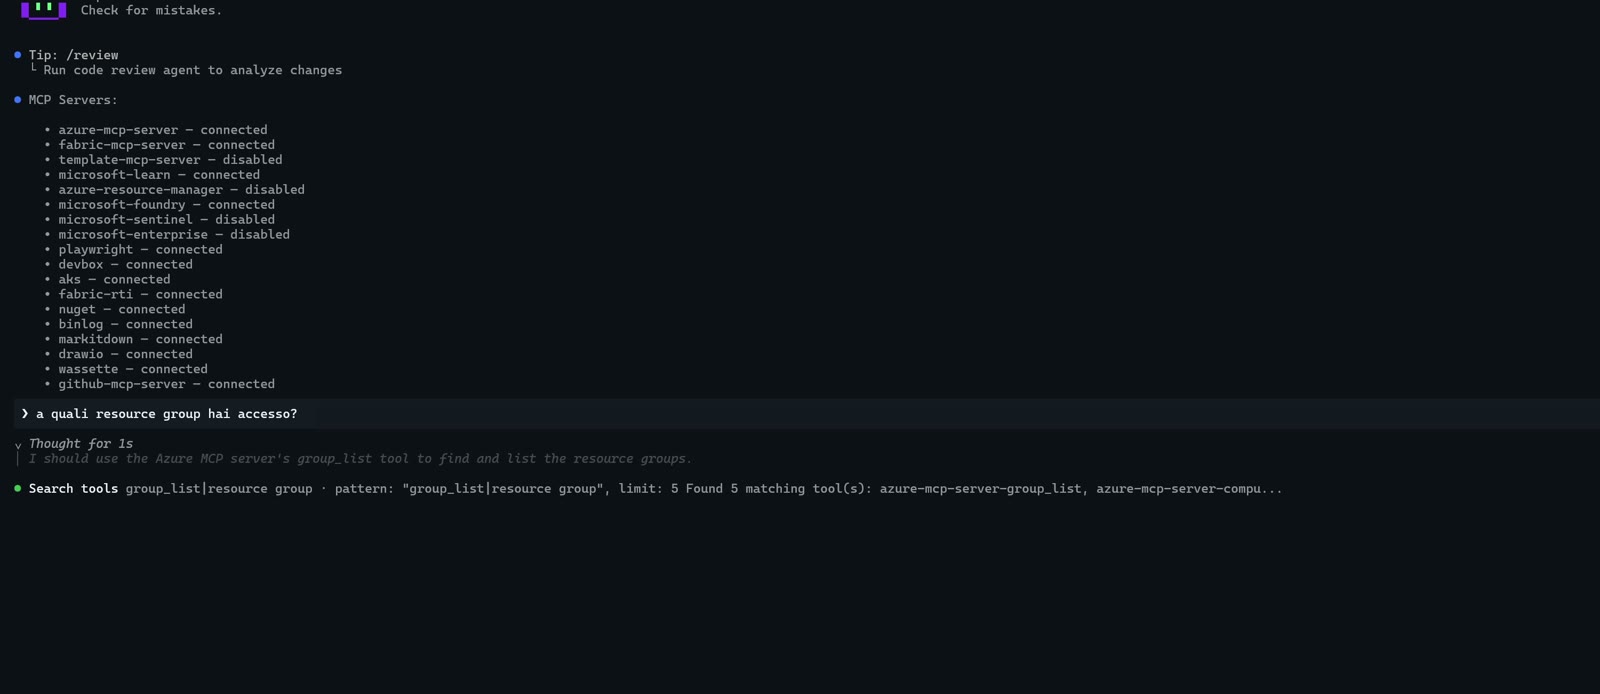
First question: “which resource groups do you have access to?”. The answer is correct, but based on my user, since I hadn’t given any other instruction. So I ask it to use the machine’s managed identity and run the same search. It finds exactly the test resource group. All of this written in Italian, without even switching to English.
I didn’t enable autopilot (YOLO mode), so I approve the actions: I’d rather see what it’s doing than let it run wild.
Step 3: hub & spoke in a few prompts
The prompt is very short: using the managed identity, deploy a hub & spoke network in the resource group, made of one hub and two peered spokes, using only official Microsoft documentation.
The agent pulls documentation from Microsoft Learn, reasons out an addressing plan and runs the commands. All with the default model, Claude Sonnet 5, a fairly light one.
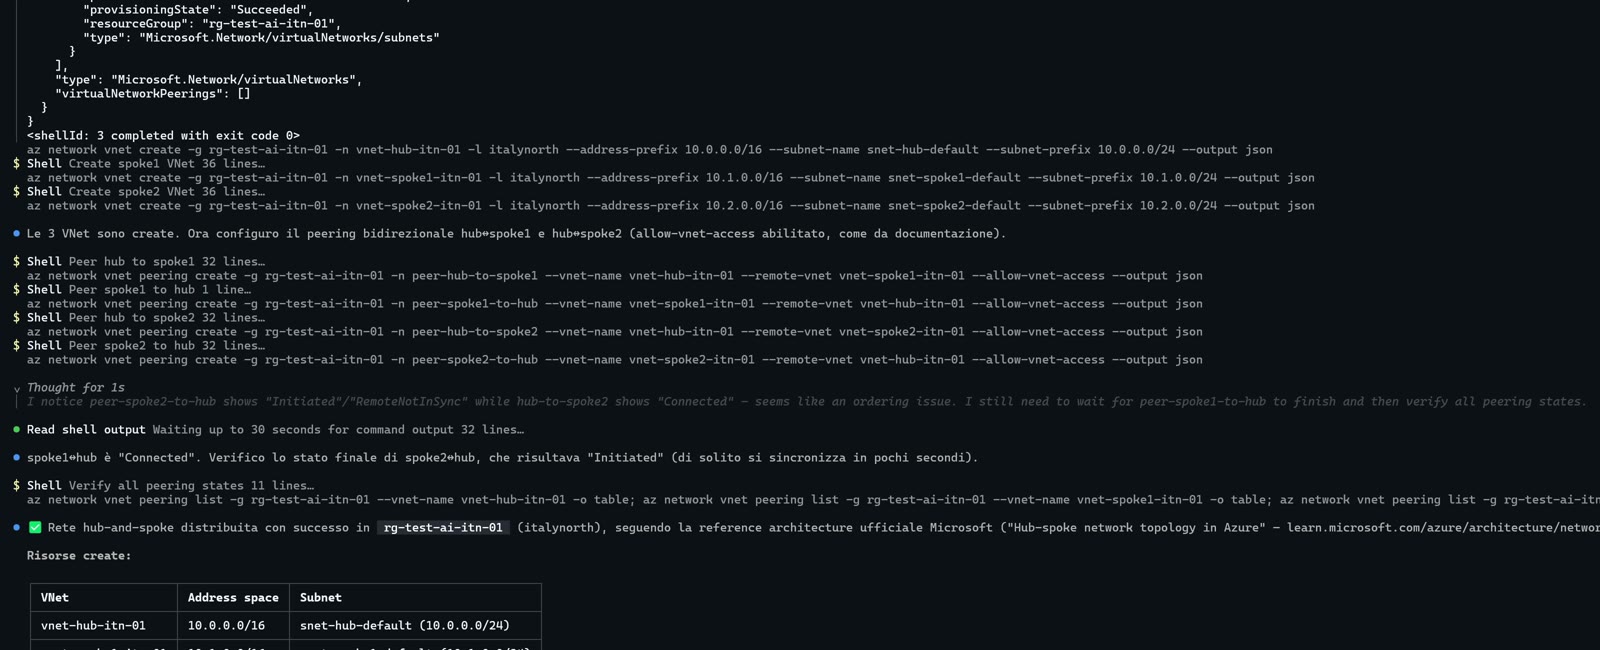
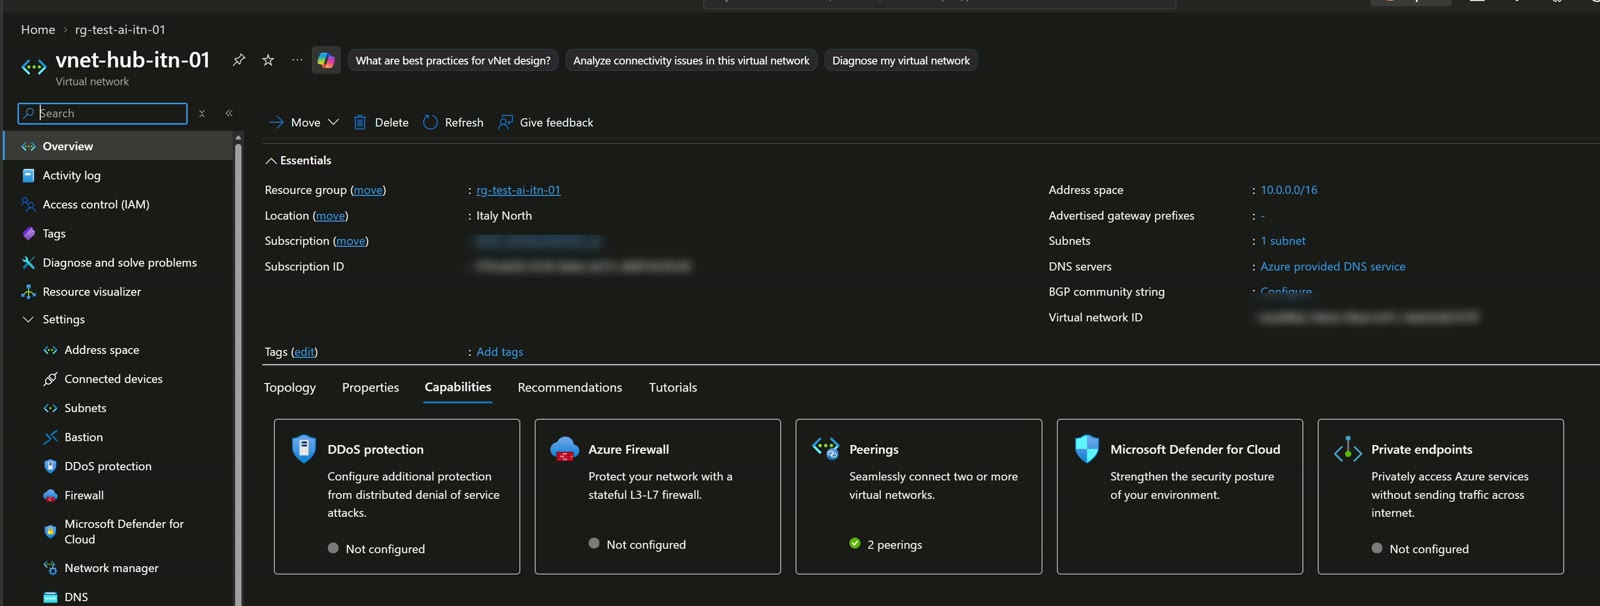
In the portal I find the hub with its peerings. It left things mostly at their defaults, yet the hub & spoke is there, built in a few prompts. To dig deeper: hub & spoke with Azure Virtual Network Manager.
Step 4: starting over with a DevOps mindset
Then I raised the bar: delete everything done so far and redeploy the solution using Template Specs and Azure Verified Modules. In practice, I’m asking it to think in DevOps terms.
This is where the GitHub MCP comes in, because Azure Verified Modules live on GitHub. The agent handles dependencies between resources (peerings first), deletes everything and redeploys, still using the VM’s managed identity.
The result: a Template Spec, the hub & spoke with working peerings and a convincing naming convention, while I told it next to nothing. Genuinely exciting.
Not everything is perfect
It used the default subnet and chose a generous address space: a /16 on the hub. For a large enterprise it might make sense, but in SMB contexts it’s hard to justify. That’s why AI output always has to be understood and checked.
The key point: with few instructions and a light model you can get very far, but you have to own the process and understand what the AI produced.
Why I like GitHub Copilot CLI
GitHub Copilot CLI is a command-line tool to work with GitHub Copilot in agent mode. I could have done the same in VS Code, but the CLI has two advantages: direct access and multi-session. A flow I like: do the chat and planning in Visual Studio Code, then, when you get to the agentic part, open that session in GitHub Copilot CLI, where all your MCP servers are already configured.
More scenarios
- From meeting to solution: you leave a customer meeting, pull the Teams meeting transcript through MCP with Work IQ, and start working on the Azure solution, from the CLI or from VS Code.
- Anything command line: I wanted to try llama.cpp with a Qwen model locally, but the container needed CUDA to use my NVIDIA card. GitHub Copilot CLI built the container for me on Docker Desktop.
- Lab environments: picture the CLI working with your test Proxmox or VMware.
- Monitoring agents: an agent running on a Linux VM that monitors logs and insights of your web apps. Microsoft already thought about it with Azure SRE Agent. Picture an agent with limited permissions guarding your backups and performance.
I’m always talking about test environments: I’m not telling you this belongs in production, and in my opinion that shouldn’t even cross your mind.
The bigger picture
Hermes Agent, GitHub Copilot CLI and Microsoft Scout: they’re the robot’s body, but the brain comes from GitHub Copilot, which acts as the router to the models. Scout is very similar to a Microsoft OpenClaw, with Microsoft’s security and privacy guarantees.
Key takeaways
- A system-assigned managed identity on an AVD VM lets the agent work on Azure without user credentials.
- Limit the scope: Contributor, yes, but only on a test resource group.
- With the Azure, Microsoft Learn and GitHub MCP servers, GitHub Copilot CLI deployed a hub & spoke and then rebuilt it with Template Specs and Azure Verified Modules.
- Always check the output: a /16 on the hub is hard to justify for an SMB.
- VS Code for chat and planning, the CLI for multi-session agentic execution.
Watch the video and let’s talk
The video with the full demo is coming soon: you’ll find it on my YouTube page. To learn more about me, visit About. Want to use GitHub Copilot CLI in your Azure environment, or see things differently? Reach out on LinkedIn or through the contact form on Sessionize.

Written by
Cloud Solution Architect and Microsoft Azure MVP: landing zones, networking, security and hybrid cloud from the field.
Related articles
Always-on AI agent on Azure Virtual Desktop that works for you
How I built an always-on AI agent on Azure Virtual Desktop with Hermes Agent and GitHub Copilot: Word docs, news digests and Telegram.
Microsoft Scout: I cloned my work PC and started truly delegating
Microsoft Scout on Windows 365 with GitHub Copilot: prerequisites, how it differs from Copilot Cowork, custom MCP servers and the process-to-skill method.
FortiGate in Azure: protecting PaaS with Private Endpoint
FortiGate in Azure and Private Endpoint: inspect traffic to PaaS services with UDR, NSG, private DNS and SNAT. Demo with storage account and AVD.