Leveraging PIM Managed Groups to manage Just-in-Time access to Azure resources
A guide to using Microsoft Entra ID PIM Managed Groups to manage Just-in-Time access to the RBAC roles of Azure resources.
Last updated on
In the modern ICT landscape there are many redundant concepts, surrounded by high-sounding buzzwords such as Security by default, Zero Trust, Just in Time, etc… Over the years I have often found myself thinking: “OK, that’s the theory, but where are the solutions?”.
In this scenario Microsoft is one of the most concrete companies, because if we wanted to dig deeper into these concepts, there is more than enough documentation that, alongside the high-sounding definitions above, offers a concrete and often easy-to-implement solution.
One of these is PIM, or for the friends in Redmond “Microsoft Privileged Identity Management”, which, given the mouthful, we will abbreviate as PIM. This technology is able to manage Just-in-Time access, that is, only for the time needed, to privileged roles or groups defined upstream by the IT department — nothing could be simpler.
The real problem I often encounter is that the technology exists, but it is frequently ignored because it is little known or out of fear of change. I see companies that have everything on-premises in terms of security, between perimeter solutions and access management solutions (PAM), but what is shocking is that when we look at the configurations done in the cloud — i.e. the natural extension of one’s own data center — not even the basic ones are present, from the firewall down.
In this guide I would like to describe the implementation of PIM Managed Groups, which allow you to manage access to Azure resources — therefore to the necessary RBAC roles — only for a well-defined period of time. In this way we can create ideal infrastructures where, apart from break-glass accounts, no user has privileged roles assigned permanently.
ENTRA ID PIM MANAGED GROUP
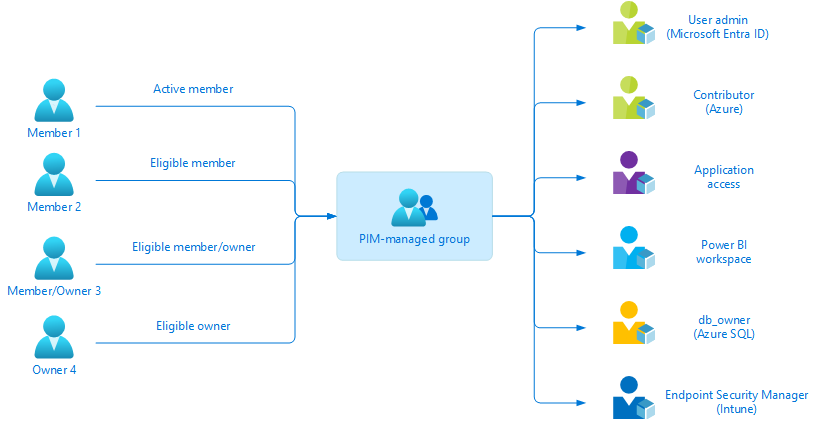
Entra ID PIM Managed Groups is an implementation based on the use of groups managed by Privileged Identity Management (PIM).
Using groups in the context of PIM offers numerous advantages, including ease of managing privileged identities without the need to handle each assignment individually, providing tenant administrators with a more consistent process for managing groups of identities with similar privileges.
Figure 1: Feature schema of PIM Managed Groups
This approach significantly reduces the IT workload and minimizes the risk of errors, assigning not only the minimum privilege but only for the time needed to carry out the operations. Using groups also allows greater flexibility in defining access rights, since administrators can create groups with different privilege levels and assign identities to these groups as needed.
REQUIREMENTS
To correctly follow this guide the following components are required:
-
Entra ID tenant
-
Entra ID permissions: Global Admin or Privileged Role Administrator
-
Licenses or a Microsoft 365 plan that includes: Microsoft Entra ID P2, Microsoft Entra ID Governance, Microsoft Entra Suite
-
Azure subscription with at least one deployed resource (in this guide you will find a Resource Group)
-
Subscription RBAC roles: Owner or User Access Administrator
CREATING THE PIM MANAGED GROUP
Sign in to the Azure portal “portal.azure.com”, completing the login with your privileged credentials. Once signed in, in the top-left corner of the page you will find a “hamburger menu”; left-click it and select “Microsoft Entra ID”:
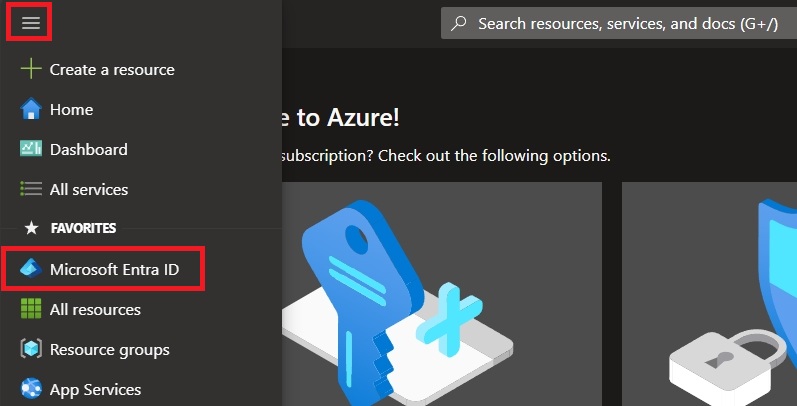
Figure 2: Selecting “Microsoft Entra ID” to access the section dedicated to identity management
We now need to create an Entra ID group, to be assigned first to a Resource Group and then to management via PIM, so as to handle Just-in-Time access to resources. In the left-hand column select “Groups”:
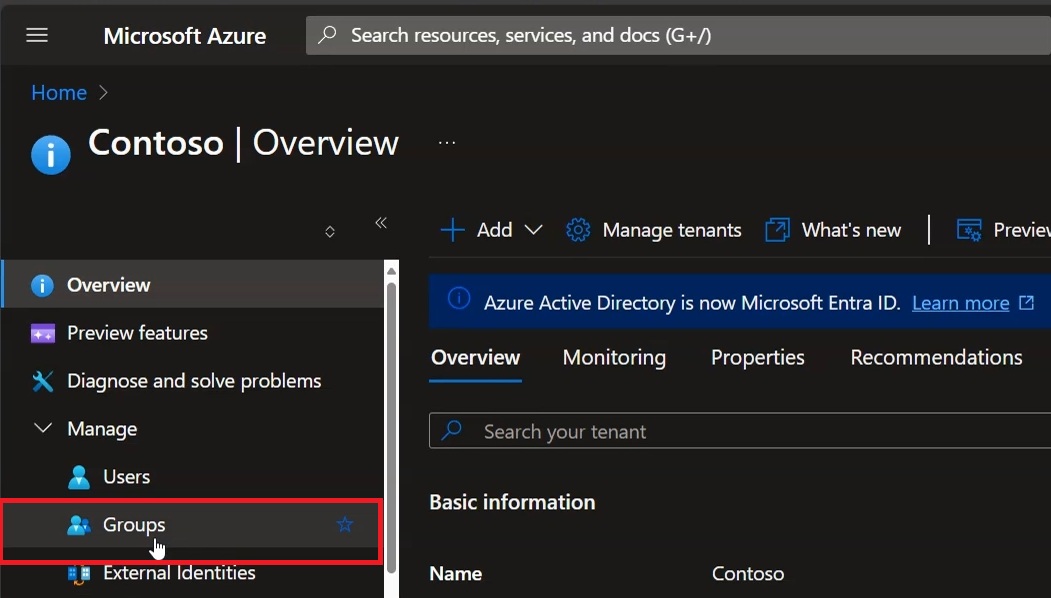
Figure 3: Click “Groups” to access the section dedicated to Entra ID groups
Now click “New group” to create a new group:
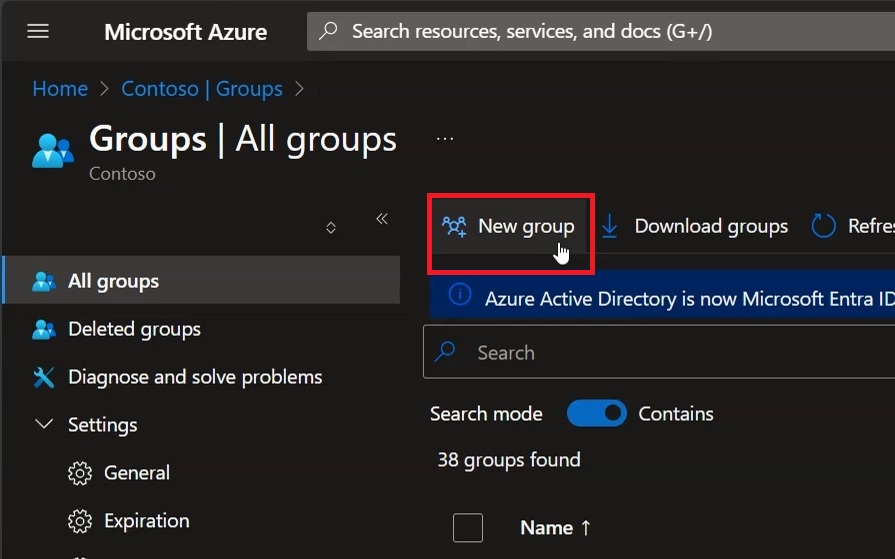
Figure 4: Click “New Group” to create a new Entra ID group
In the new group creation wizard, fill in the fields using your own naming convention; this way it will be easy to distinguish the groups managed by PIM from other types.
-
Group Type: Security
-
Group Name: GRP-SEC-PIM-AZ-RG-ID-WE01-CONTRIBUTOR
-
Group Description (optional): group managed by PIM
Do not add any members to this group, since membership in it will be regulated by PIM without the need to add users manually. When you are done, select “Create”.
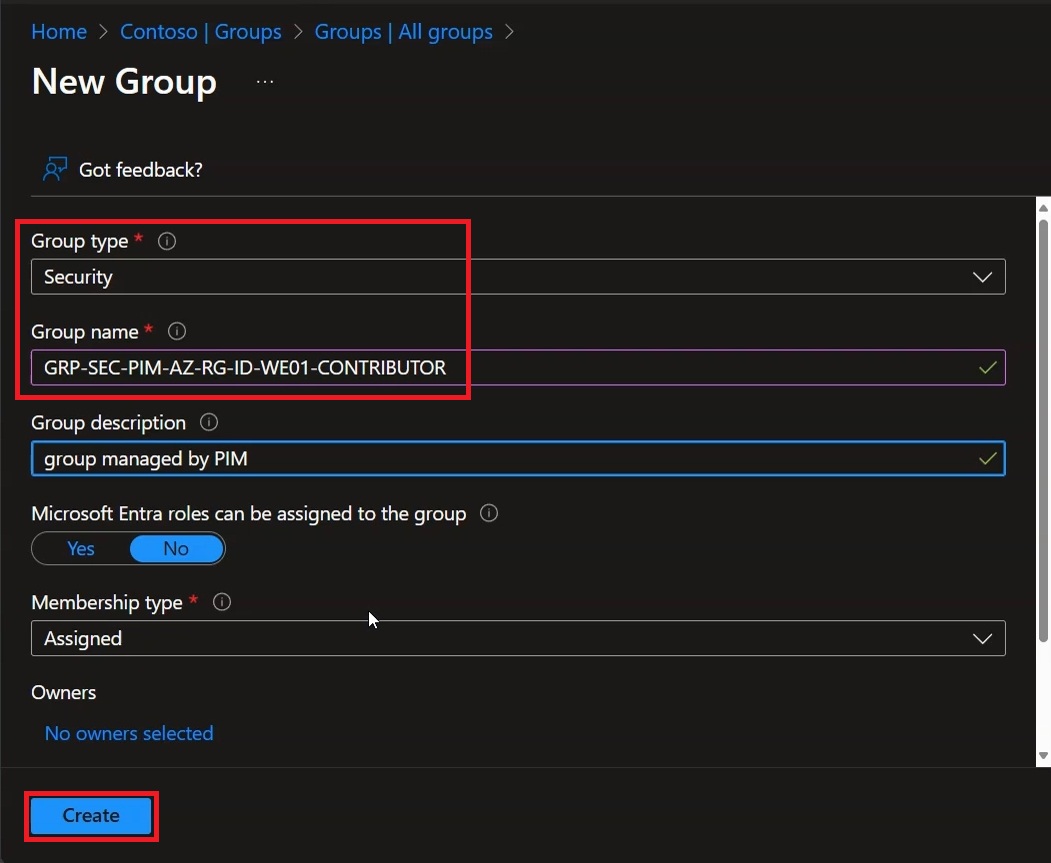
Figure 5: Filling in the fields required to create an Entra ID group
Once the group has been created, you can run a quick search to verify that it appears in the list of Entra ID groups. Now click the name of the new group:
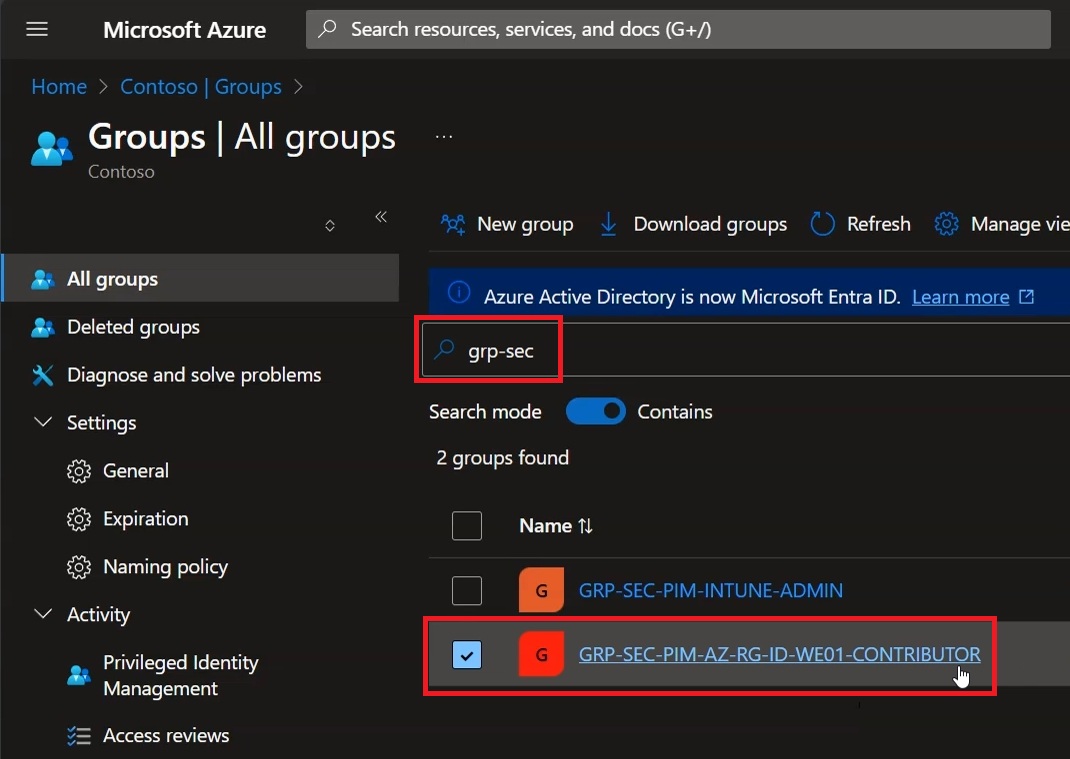
Figure 6: Verifying the creation of the Entra ID group
Inside the newly created group you can verify that there are no assigned users of any kind, because, as specified in the previous steps, these accounts will be managed by Entra ID PIM:
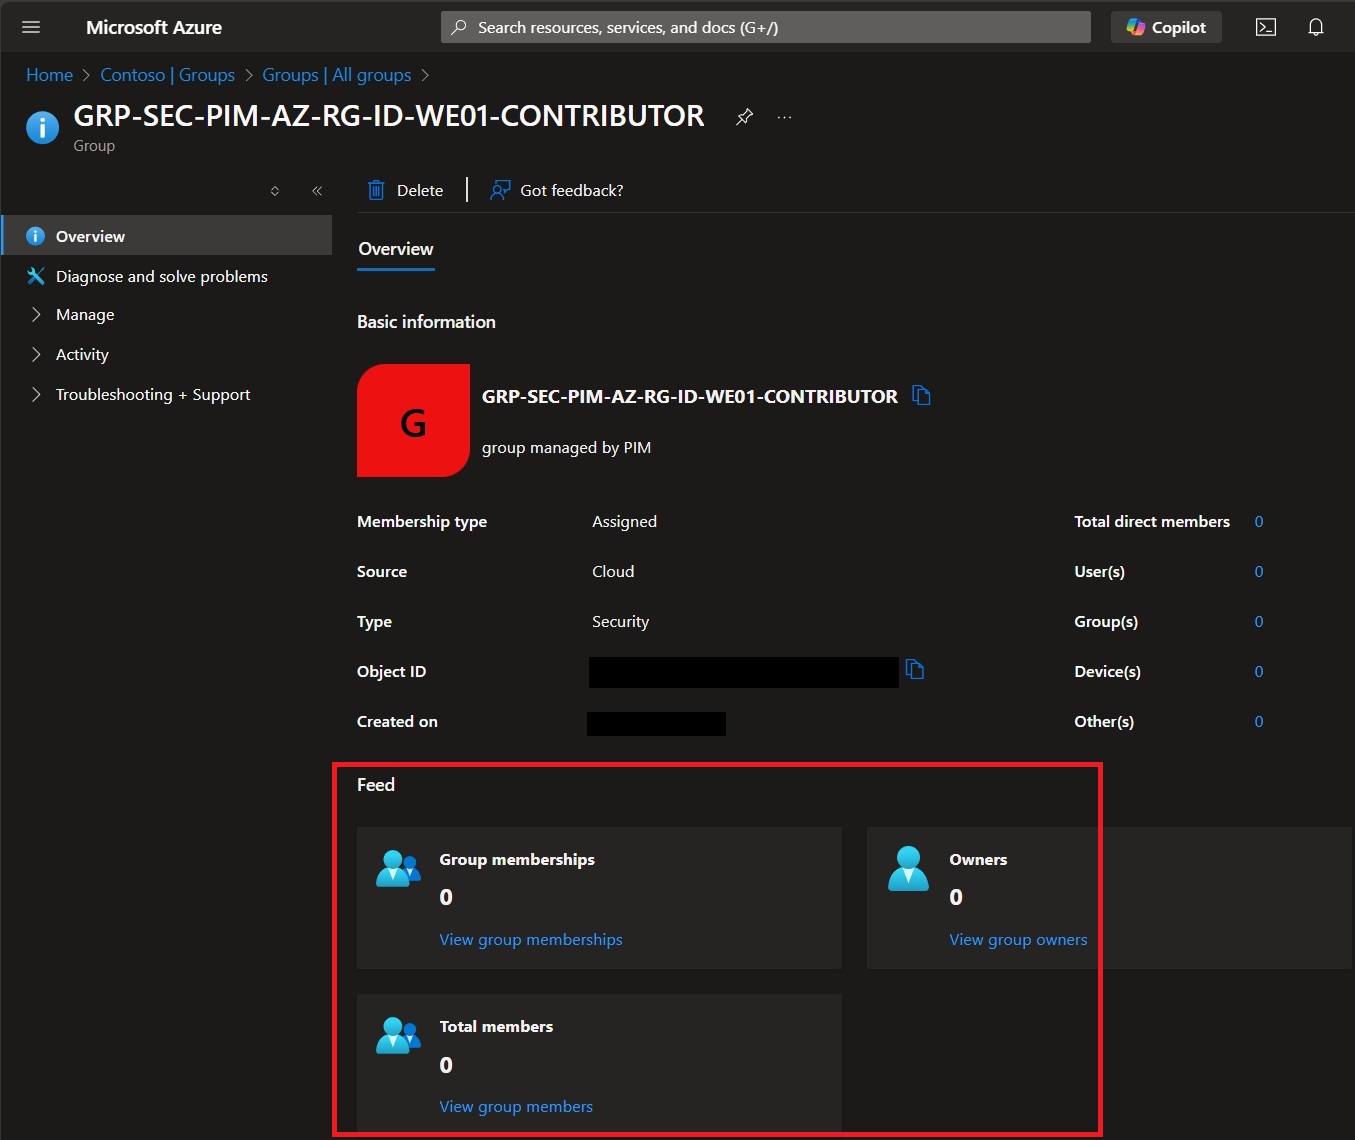
Figure 7: Verifying that there are no users in the group
Let’s go back to the Azure Home Page, or alternatively run a search in the top object search bar, typing “Resource Group” and selecting it:
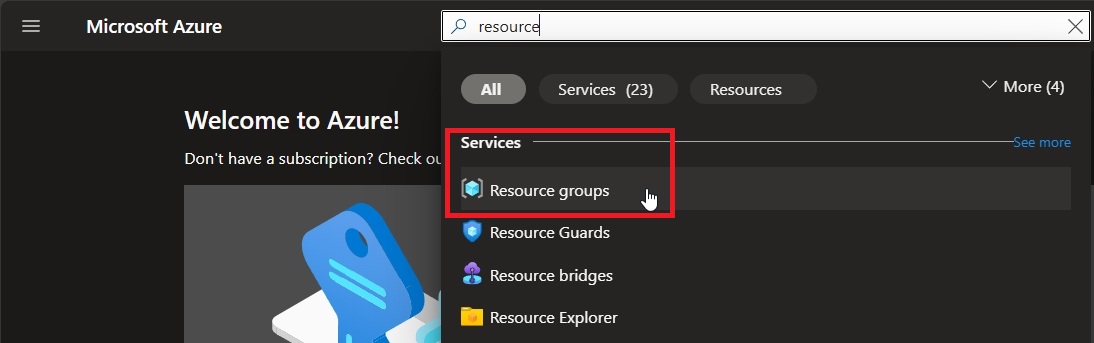
Figure 8: Searching for objects of type “Resource Group”
Select the “Resource Group” to which we want to assign the Entra ID group “GRP-SEC-PIM-AZ-RG-ID-WE01-CONTRIBUTOR” created earlier:
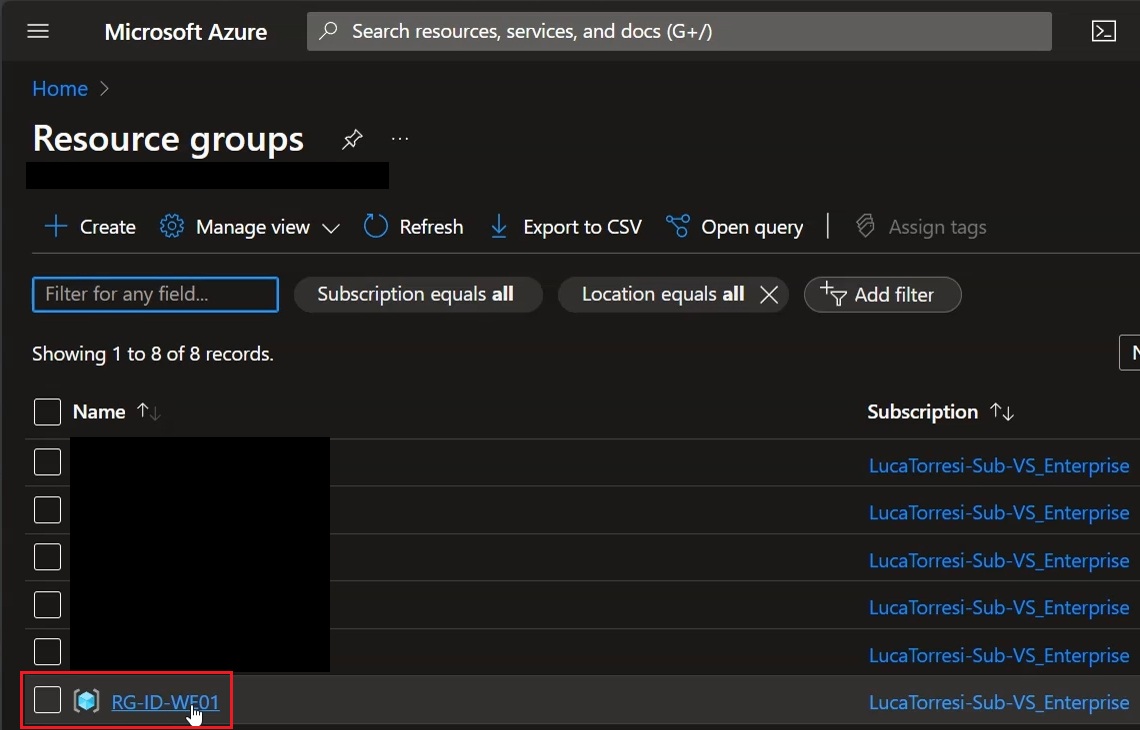
Figure 9: Selecting the “Resource Group” to be managed via PIM
Once inside the Resource Group, in the left-hand column, select the “Access control (IAM)” tab, where you can assign RBAC roles:
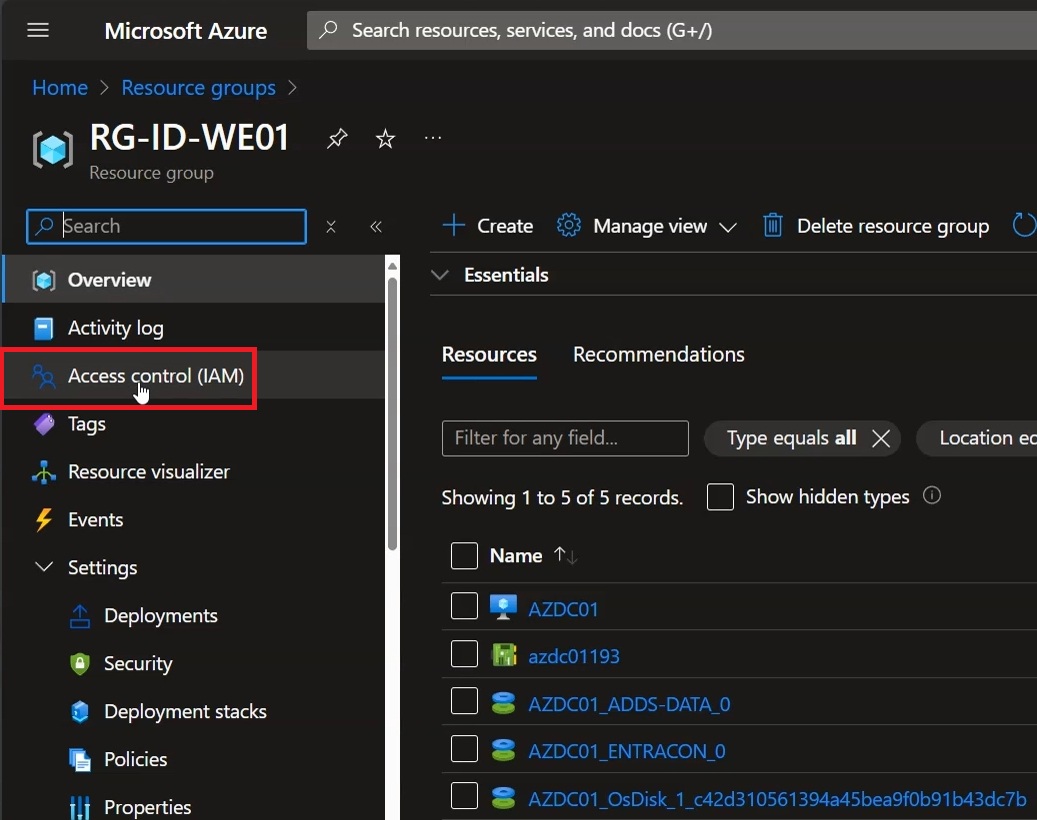
Figure 10: Selecting the “Access control (IAM)” tab to access the section dedicated to role management
In the central area of the page, click “Role assignments” to access the section dedicated to assigning roles within the Resource Group:
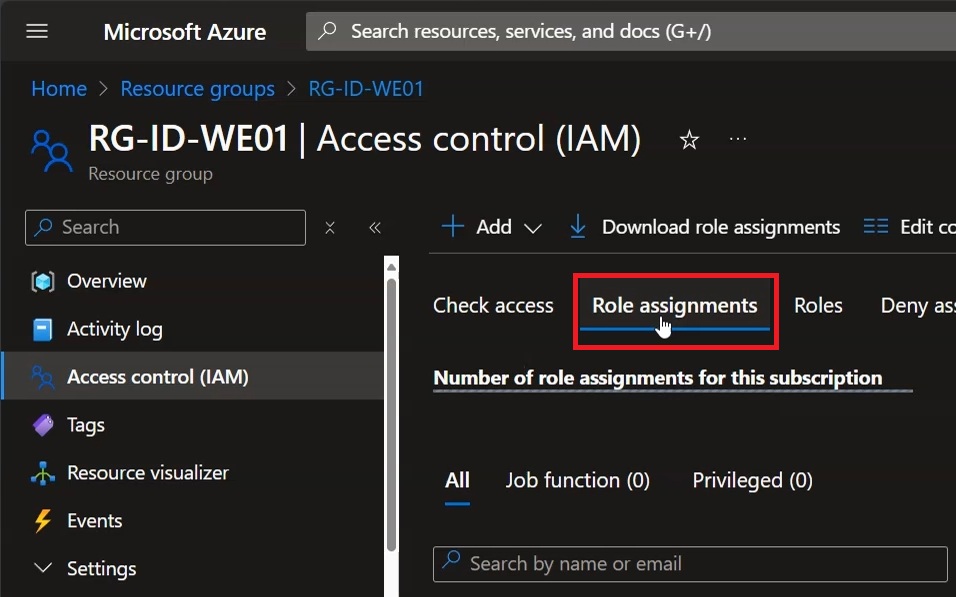
Figure 11: Entering the “Role assignments” section to assign RBAC roles
Now click the “Add” button and then “Add role assignment”:
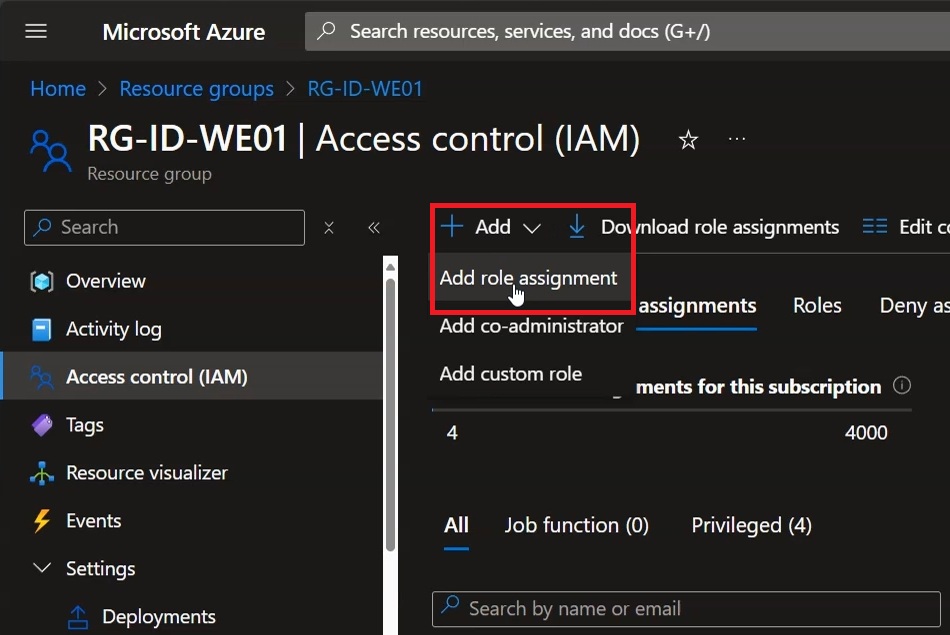
Figure 12: Click “Add” and then “Add role assignment” to assign RBAC roles to the group
At this point click “Privileged administrator roles”, and in the search field type the role you want to assign, in this case “Contributor”. Once you have selected the role with a left-click of the mouse, you can proceed by clicking “Next”:
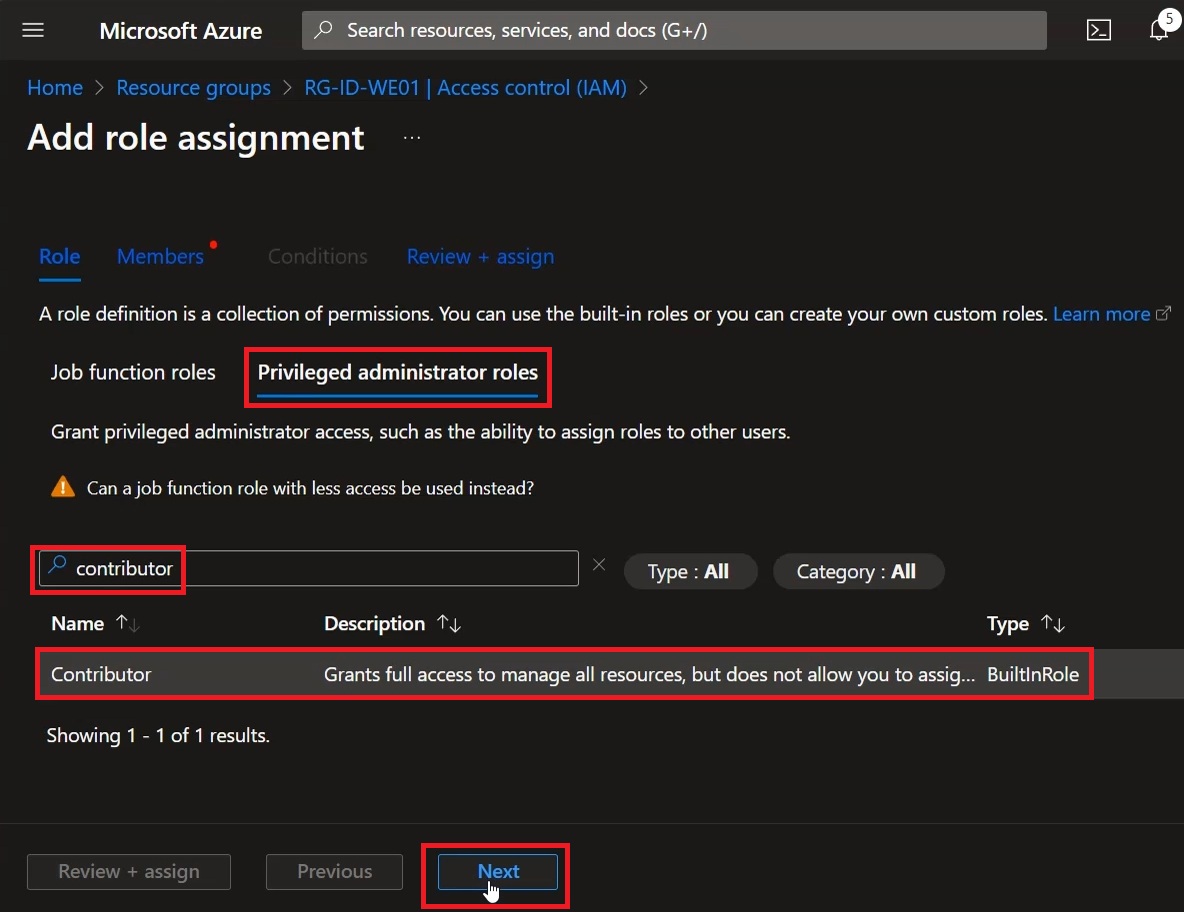
Figure 13: Assigning the Contributor role as the RBAC role
In the “Members” section click ”+ Select members” to open the tab dedicated to assigning groups/users:
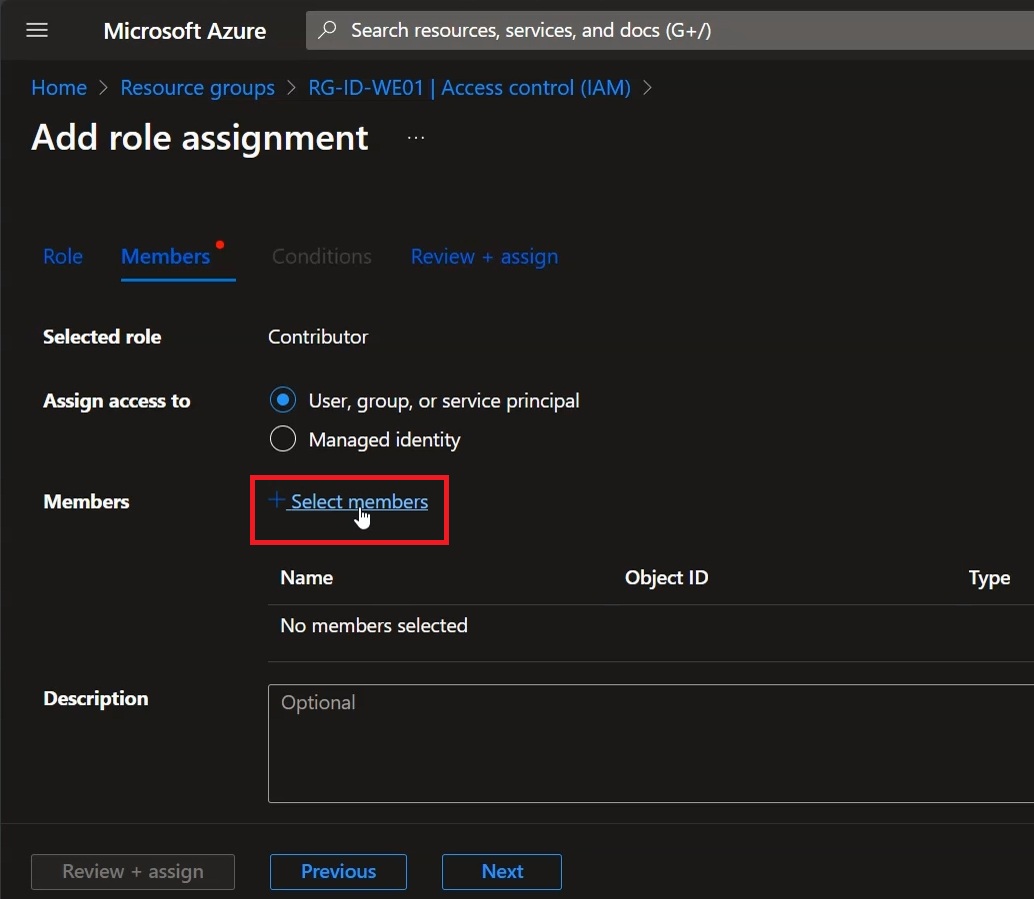
Figure 14: Selecting ”+ Select members” to assign the “Contributor” role to users or groups
In the tab that opens on the right, under the “Select” text field, type the name of the Entra ID group created earlier, then click the group name to add it to the “Selected Members” section. When you are done, you can click the blue “Select” button to confirm your choice:
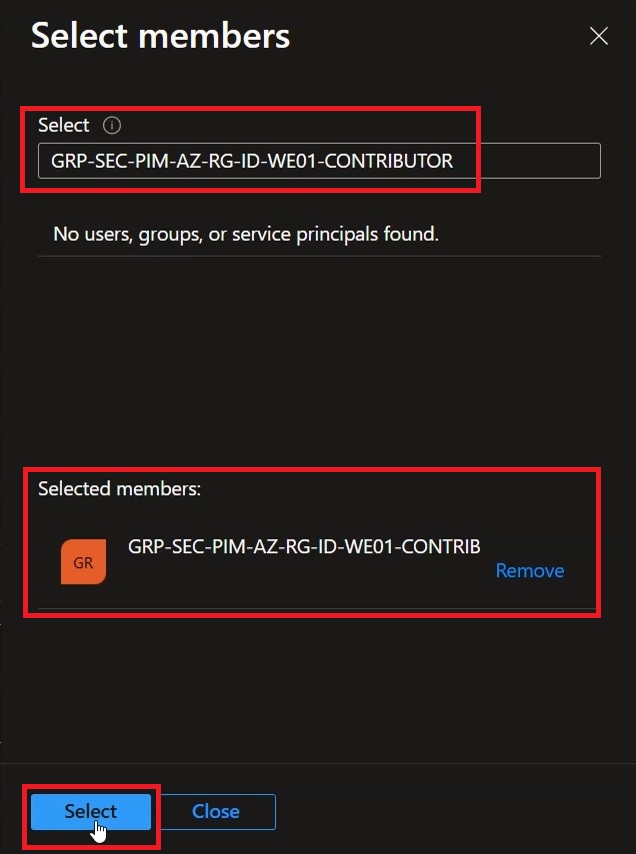
Figure 15: Selecting the group to which the “Contributor” role will be assigned
Having verified that everything is correct, you can click “Next” to continue to the next section.
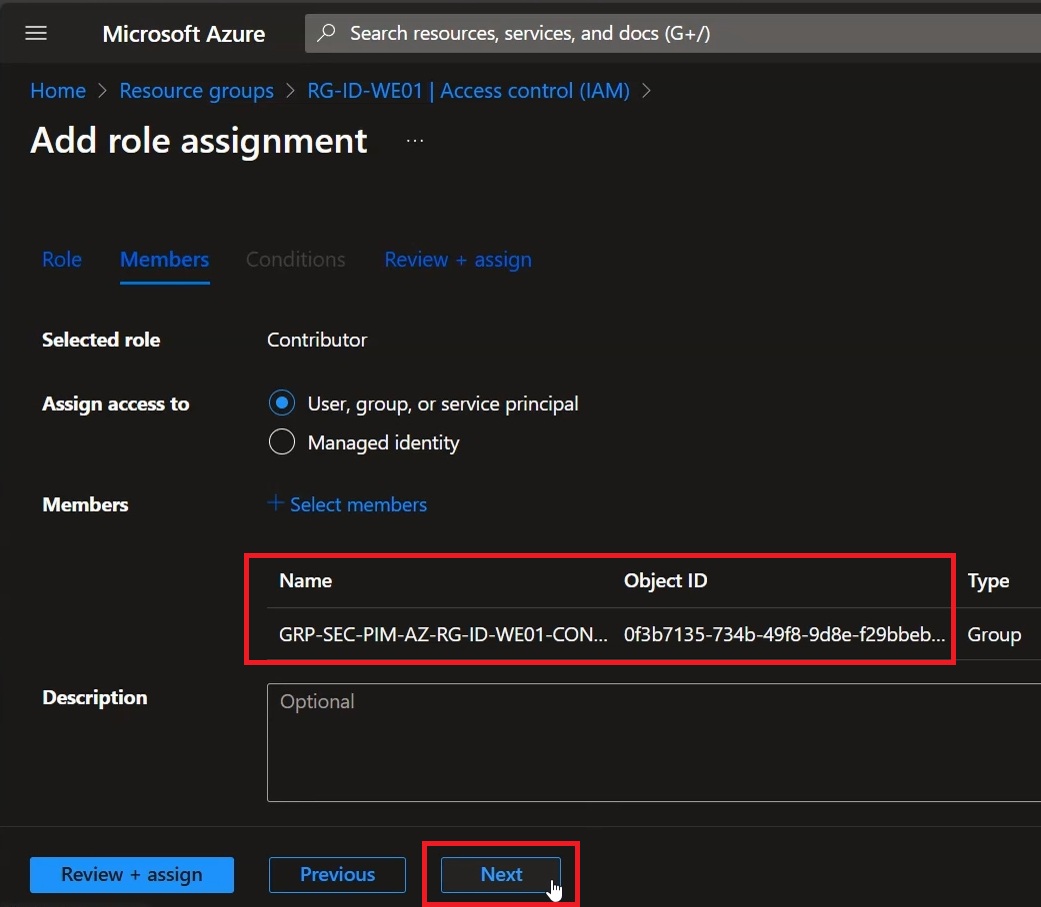
Figure 16: Verifying that the parameters have been entered correctly
Click “Review + assign” to complete the RBAC role assignment process.
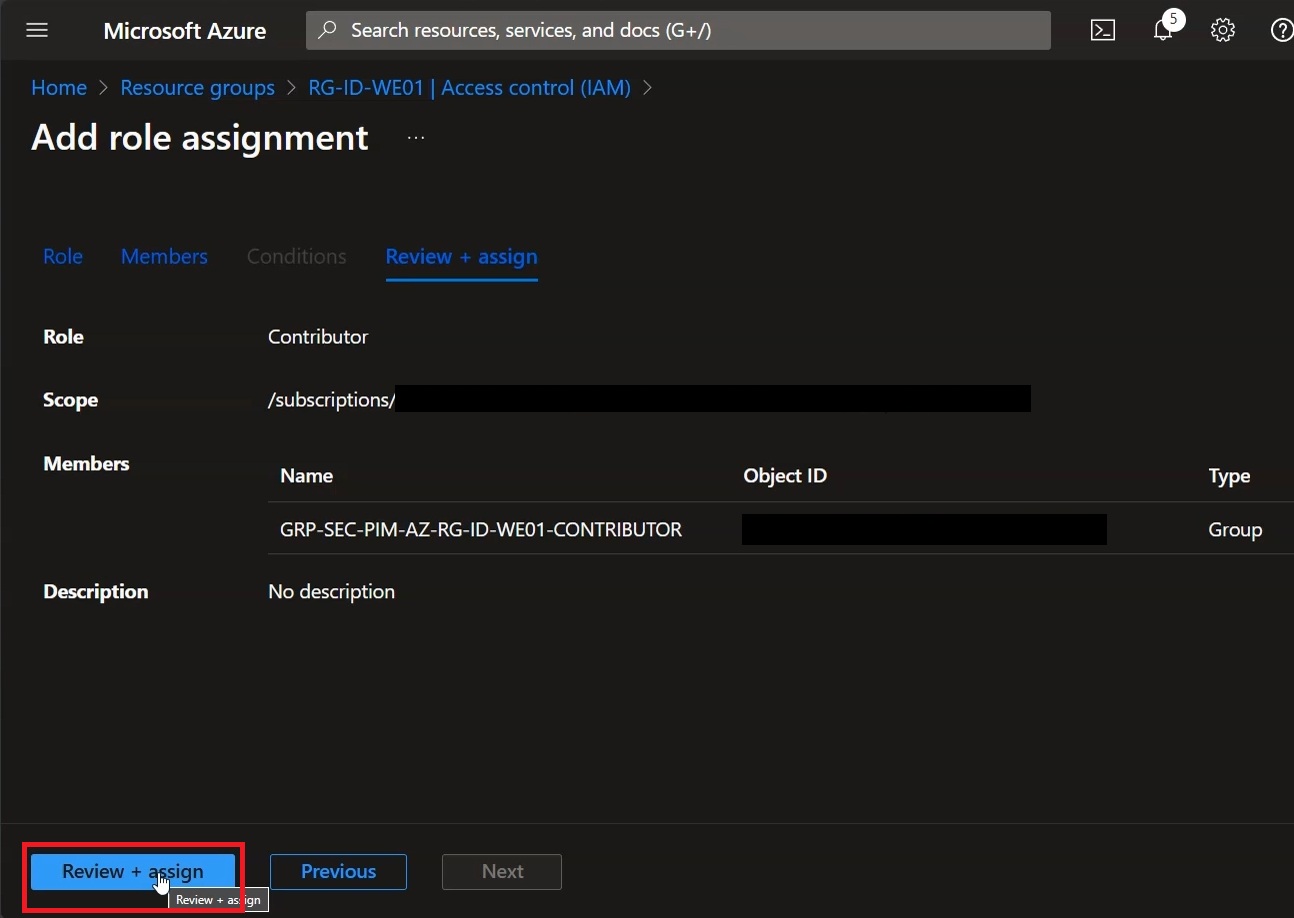
Figure 17: Completing the assignment of the RBAC role to the group
When you are done, a notification at the top left signals that the role has been assigned correctly:
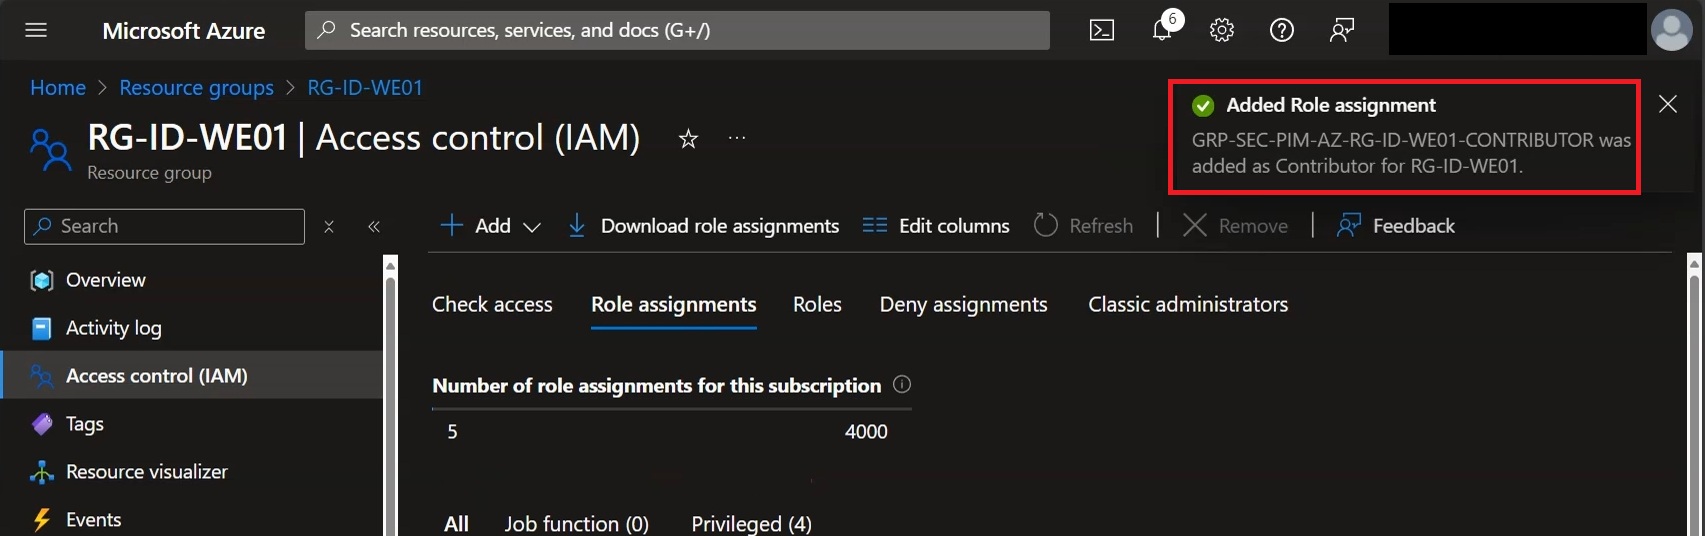
Figure 18: Notification that the RBAC role has been assigned correctly
ONBOARDING THE GROUP INTO PIM
You can now return to the main page “portal.azure.com” and type “Microsoft Entra Privileged Identity Management” in the search field, then select the “Microsoft Entra Privileged Identity Management” entry:
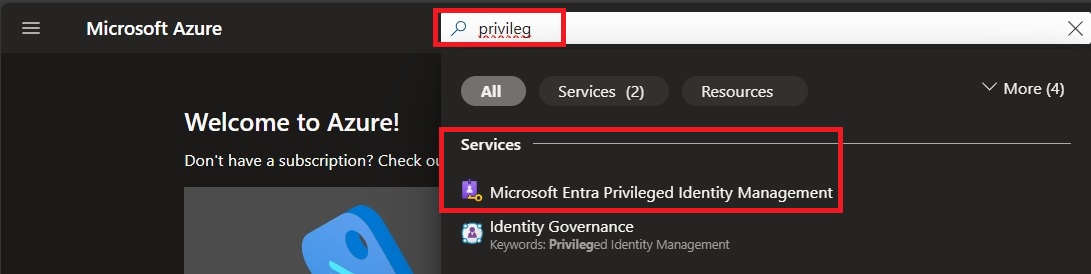
Figure 19: Selecting the “Microsoft Entra Privileged Identity Management” entry
In the left-hand column select “Groups” to access the section dedicated to managing groups via PIM:
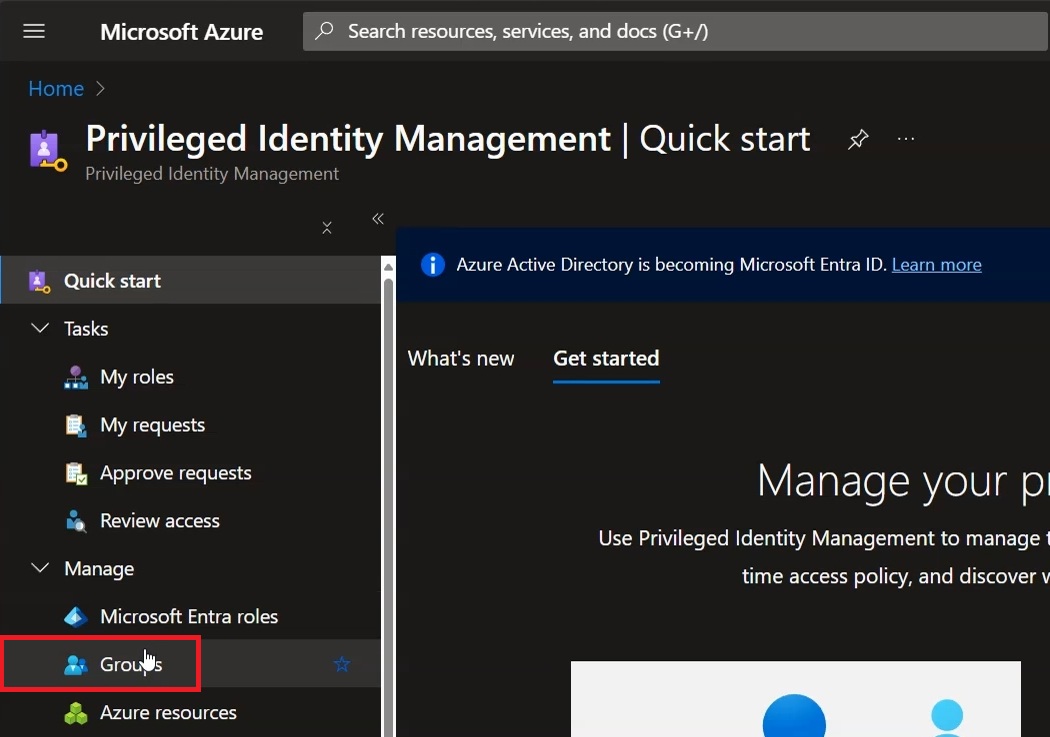
Figure 20: Selecting “Groups” to manage PIM groups
In the central section of the page, select “Discover groups” to search for the Entra ID group created in the previous steps:
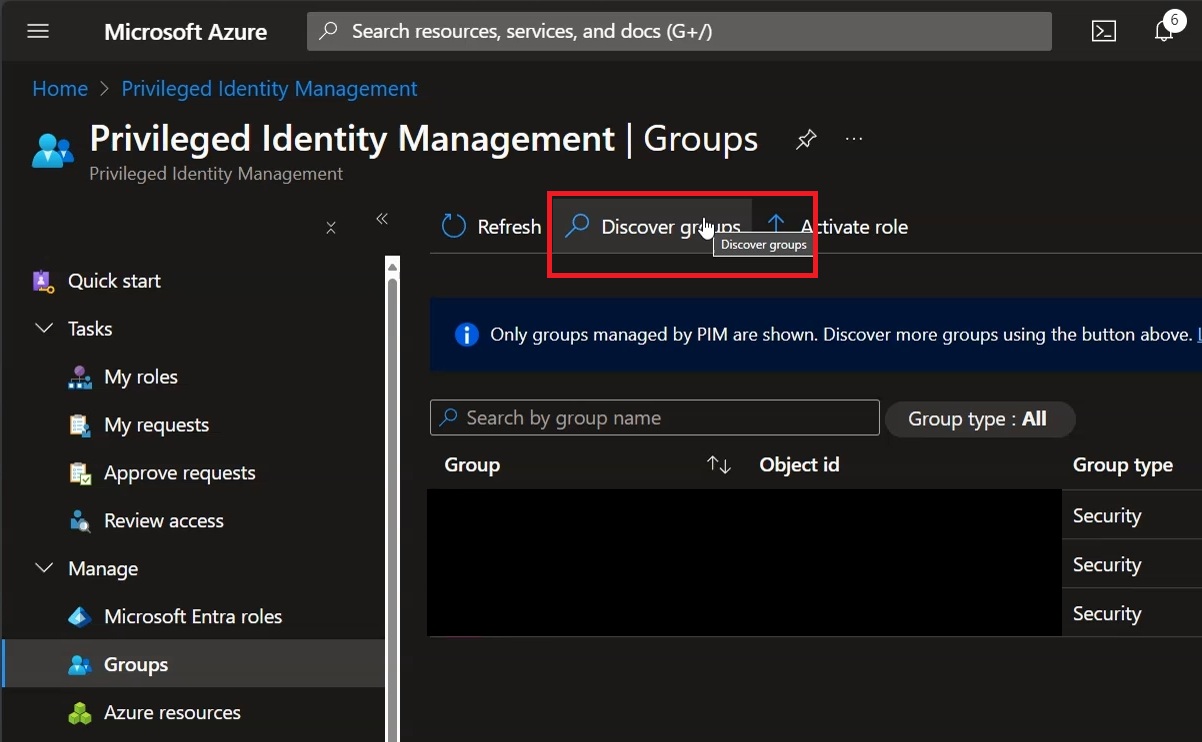
Figure 21: Selecting “Discover Groups” to choose the Entra ID group to manage via PIM
Once you have landed in the “Groups – Discovery” section, run a search by the name of the group you want to manage via PIM, select the target group and finally click “Manage groups”:
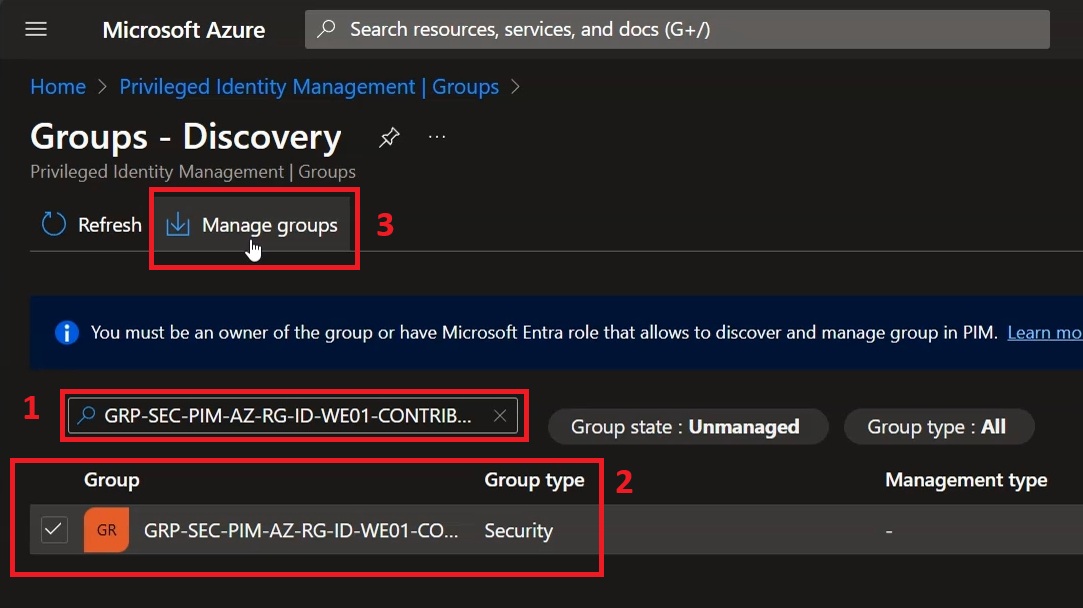
Figure 22: Enrolling the Entra ID group into PIM
In the window that opens with the title “Onboard selected groups”, click “ok” to confirm the enrollment of the group into PIM:
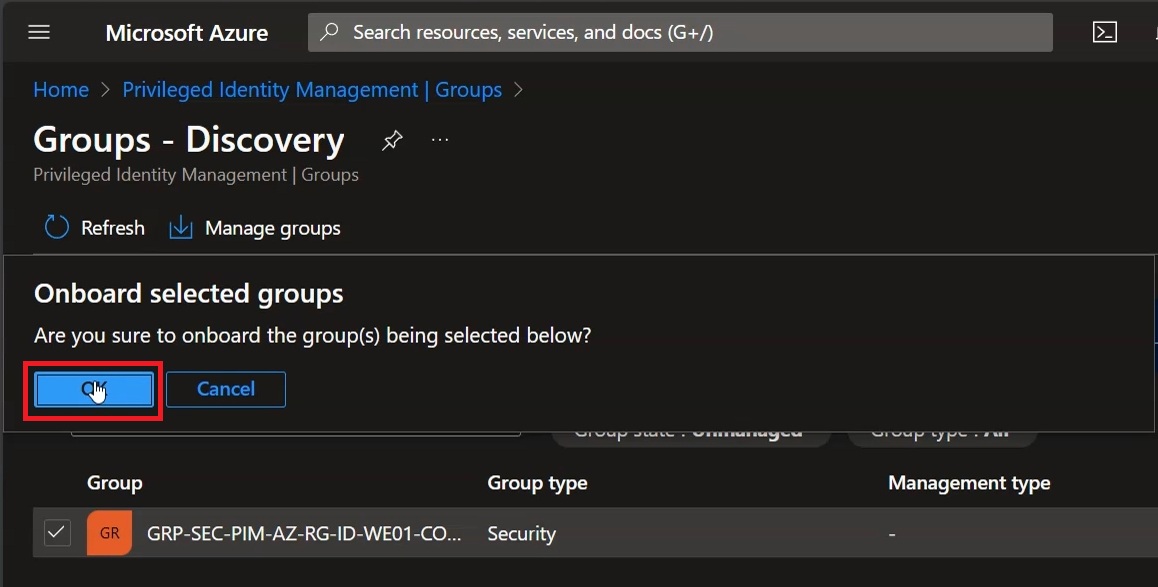
Figure 23: Confirming the enrollment of the group into PIM
When the operation completes, a message will be displayed at the top left of the Azure portal notifying you that the operation has been carried out correctly:
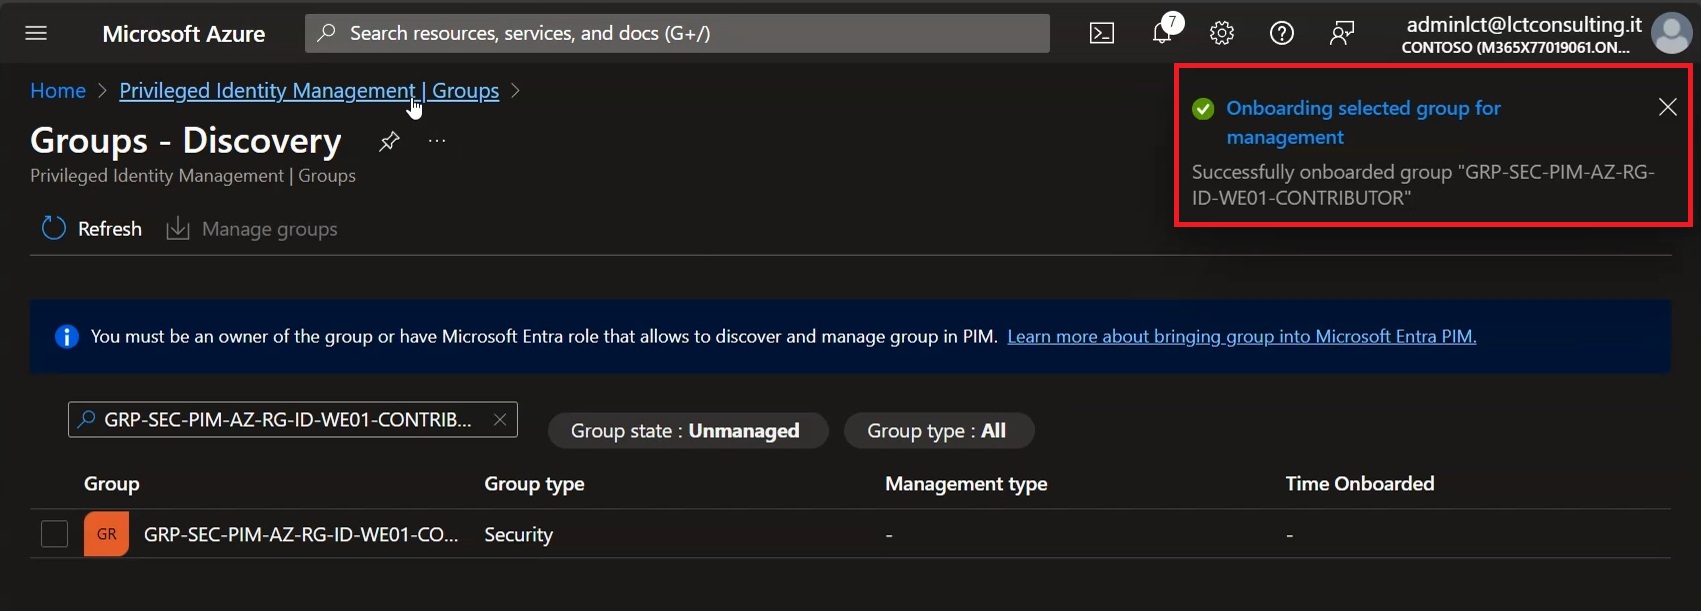
Figure 24: Confirmation message that the selected PIM group has been onboarded
Now go back one level by selecting “Privileged Identity Management | Groups” in the top section of the portal:
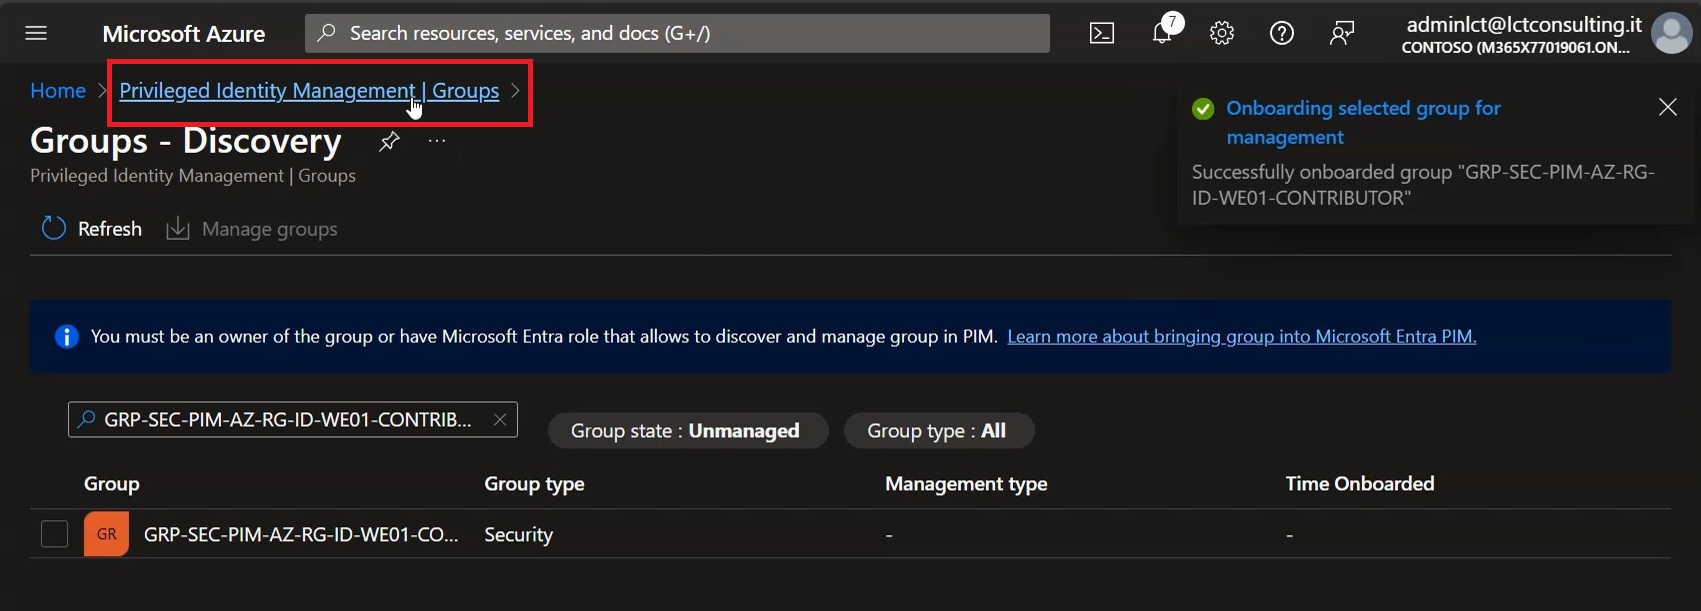
Figure 25: Going back one level to verify that the group has been assigned to PIM
Verify that the group name appears among those managed by Microsoft Entra ID Privileged Identity Management, then left-click to access the group’s PIM configuration:
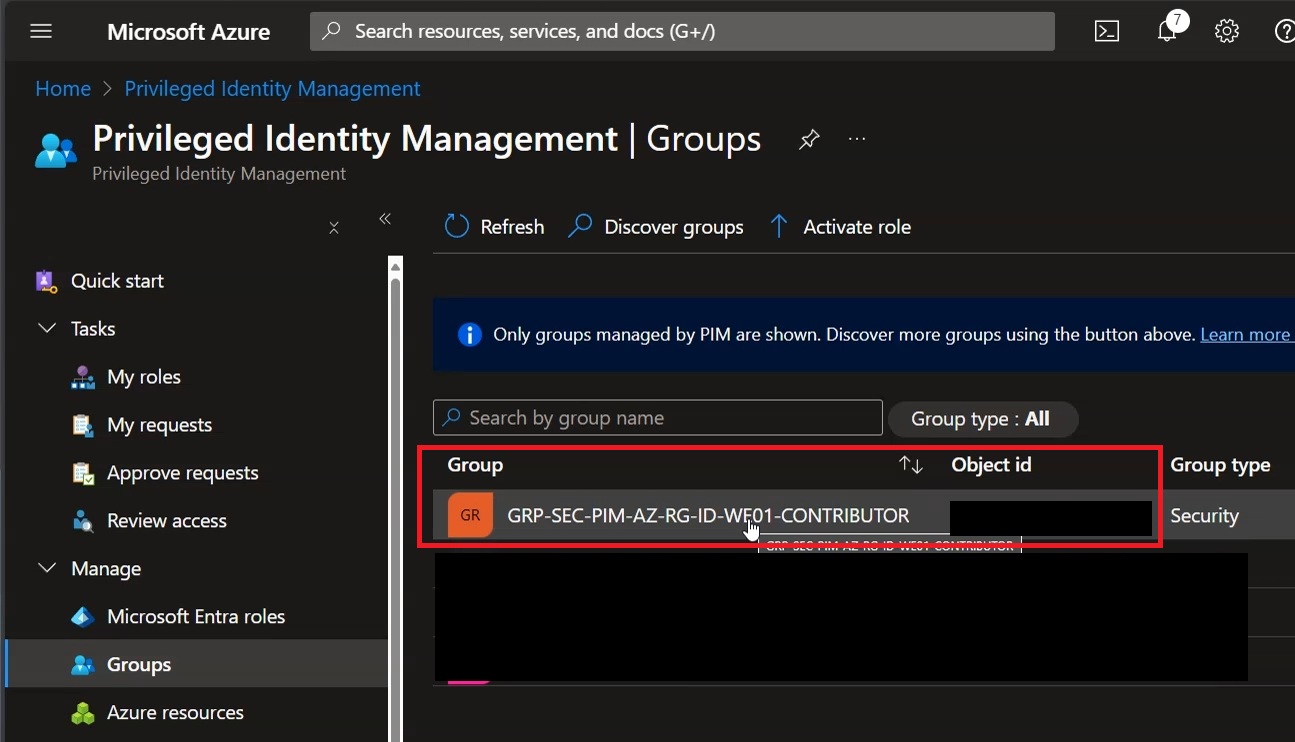
Figure 26: Left-click the name of the group managed by PIM to access its configuration
Click “Assignments” in the left-hand column to start the procedure of assigning users to the PIM group:
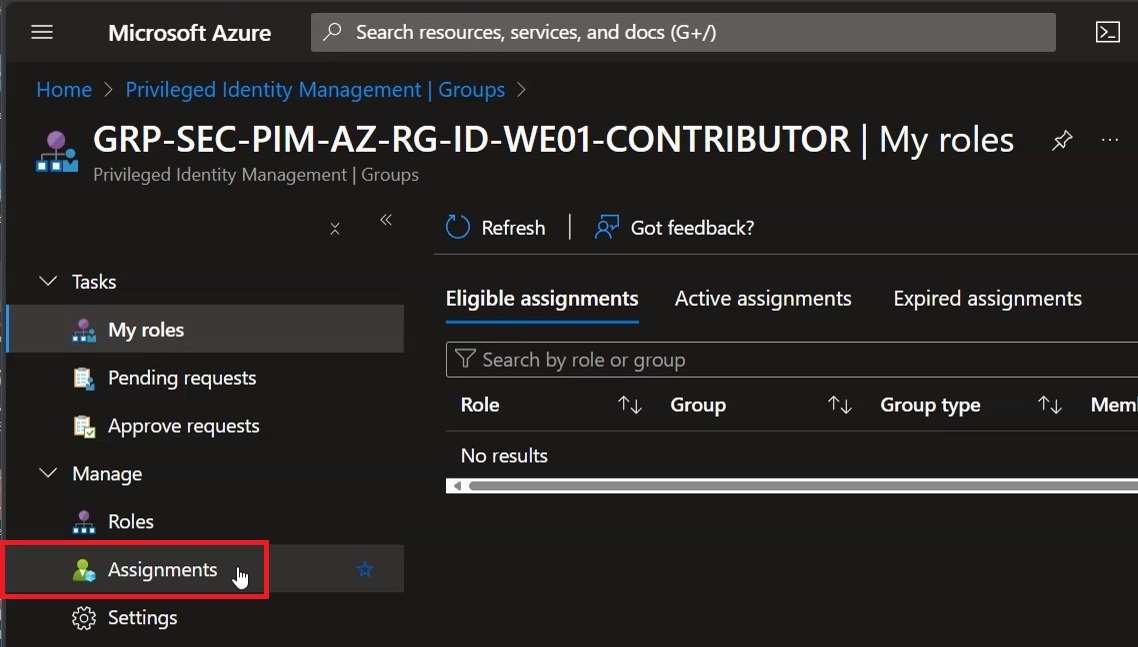
Figure 27: Click “Assignments” to start the procedure of assigning users to the PIM group
At this point, since for the purposes of this guide we want to make the user “Eligible”, click “Add assignments”:
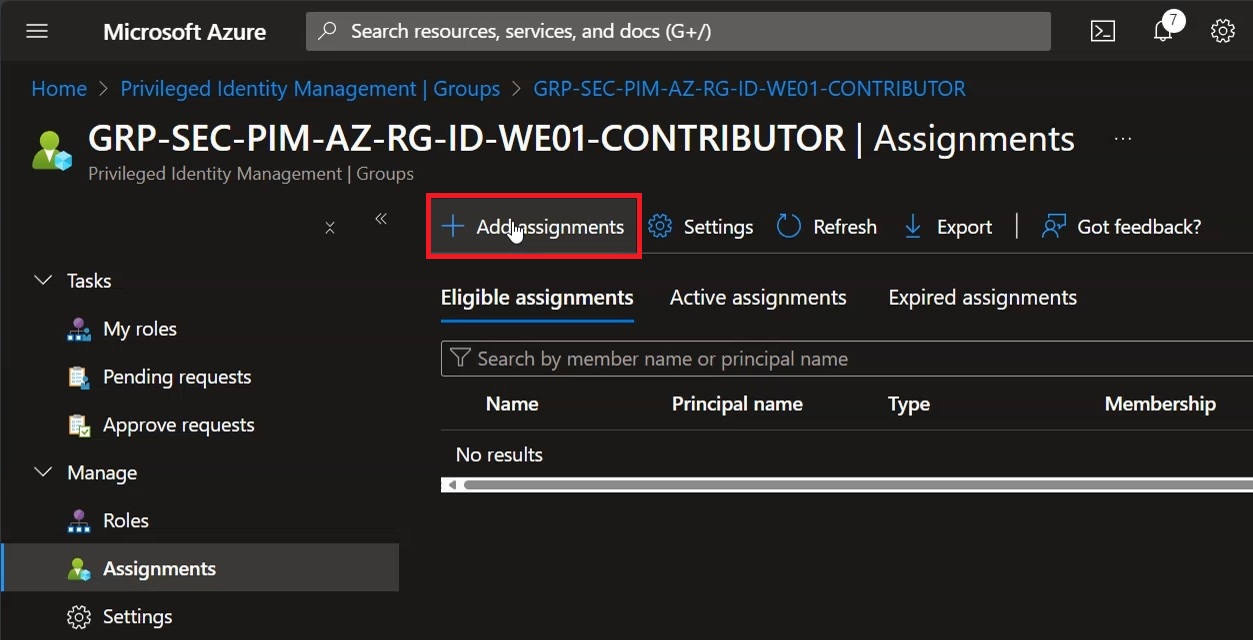
Figure 28: Click “Add assignments”
In the wizard that opens, in the “Membership” section click “Search role” and select “Member”:
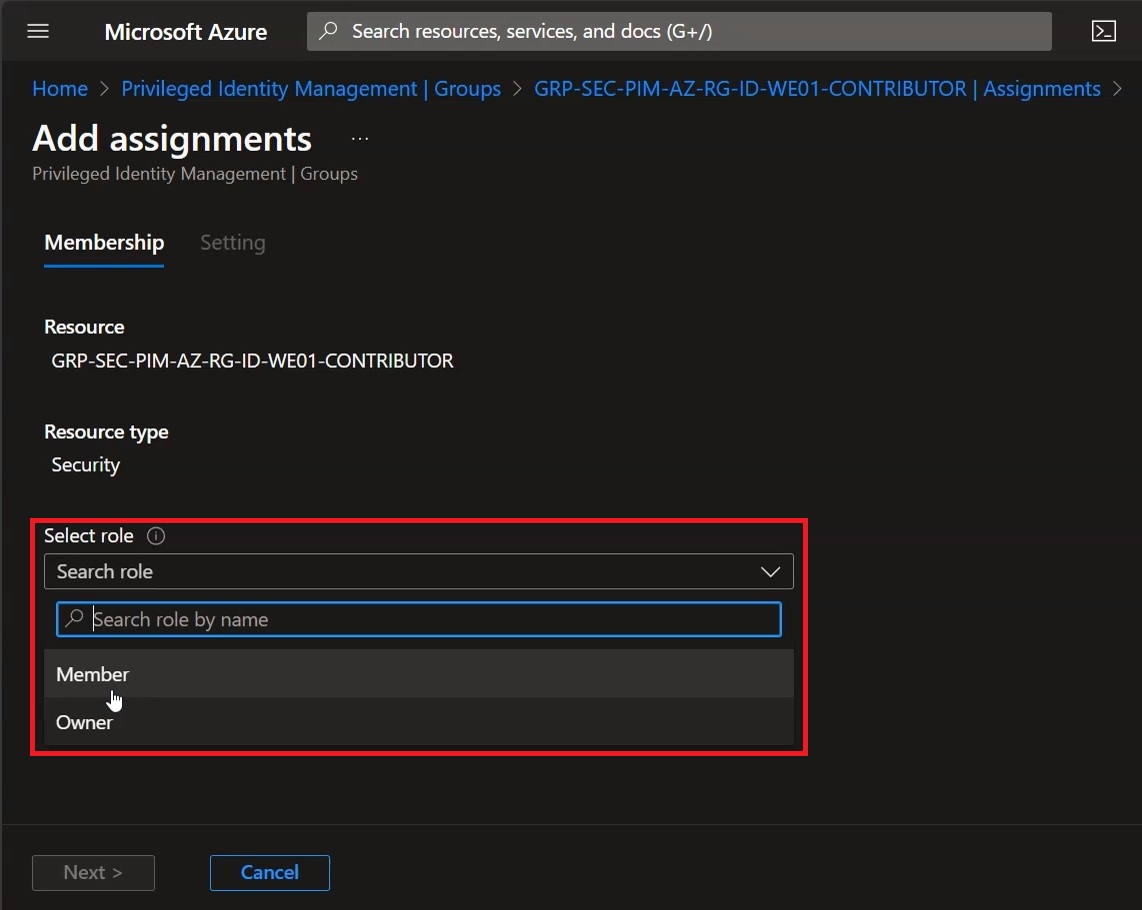
Figure 29: Selecting “Member” in the “Search role” tab
Remember that you can have different PIM settings for “Member” and “Owner” users, so as to have, for example, one type of access to the same resource dedicated to the internal IT team and another for external consultants who may require different settings. Now click “No member Selected” under “Select member(s)” to add the target users of your PIM deployment:
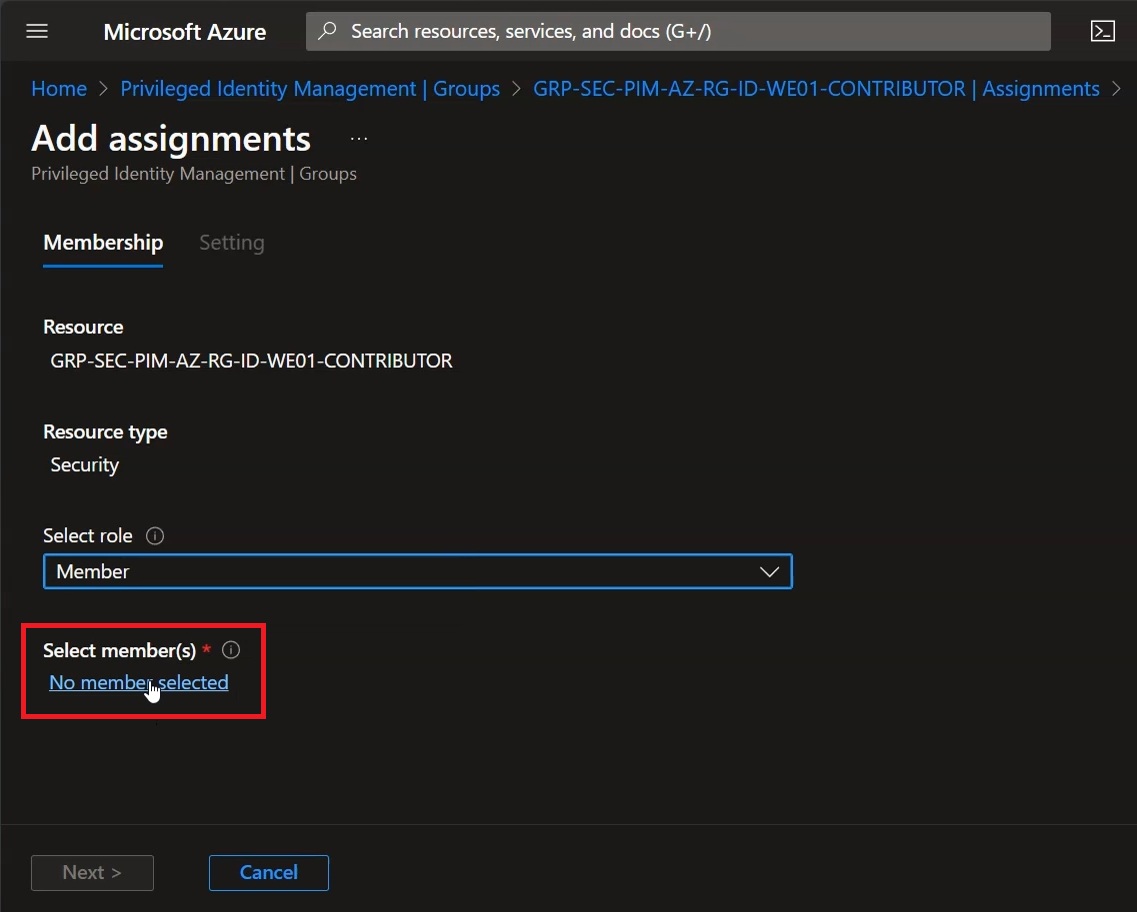
Figure 30: Adding PIM users to the group
Now select the user for which you want to manage the group assignment via PIM, verify that the user appears in the right-hand column under “Selected”, then click “Select” to confirm your choice:
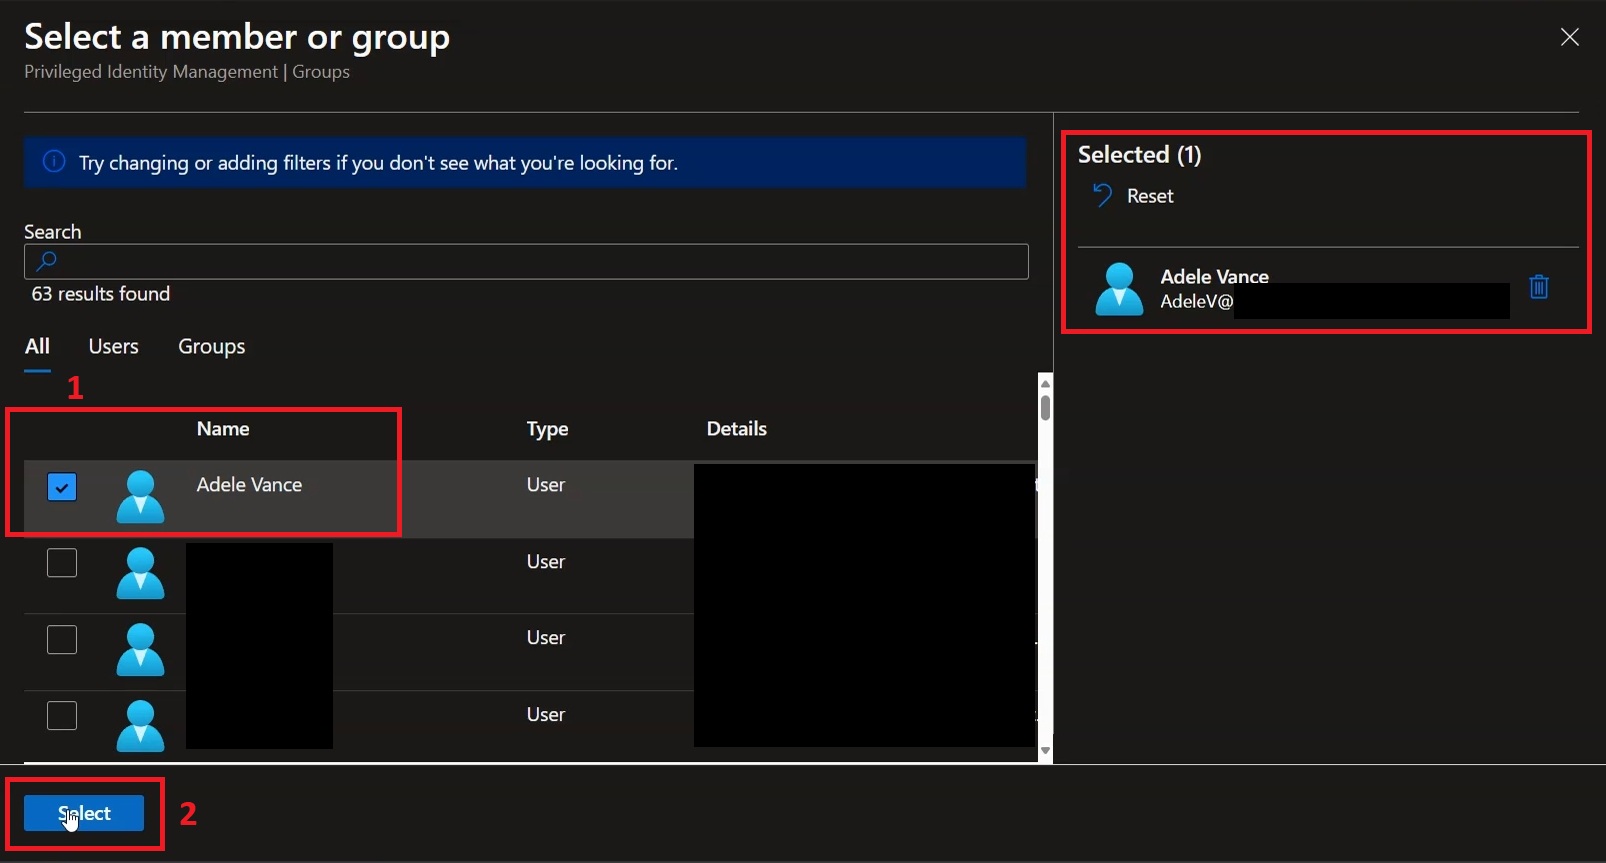
Figure 31: Select the target user, then click Select to add it to the PIM group
Verify that the settings are correct and click “Next” to confirm:
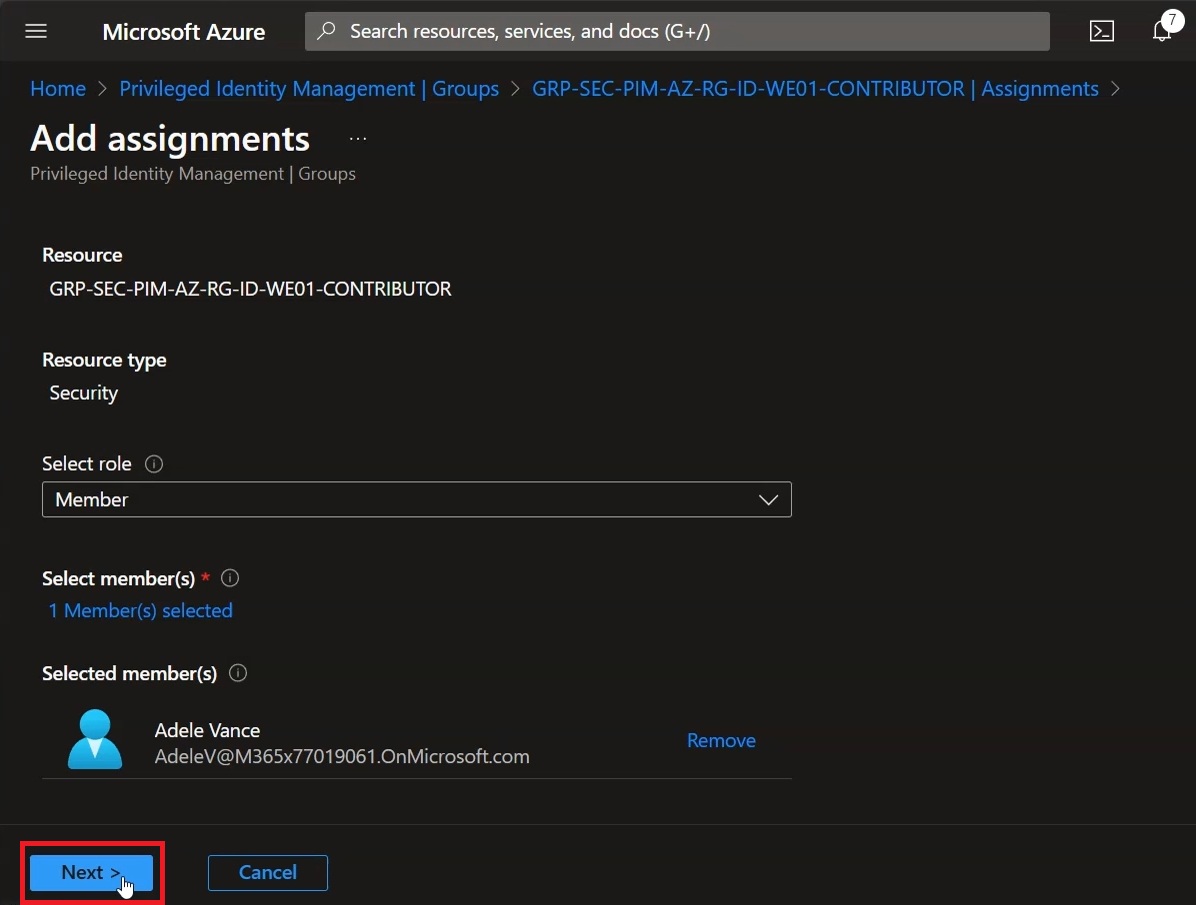
Figure 32: Click “Next” to confirm
In the next section we will be asked to configure, under “Assignment Type”, how we want to manage PIM access, whether in “Eligible” or “Active” mode:
-
Eligible: The user will not have the role assigned by default, therefore when signing in to the Azure portal they will not see any resource. To gain access they will always have to request privilege elevation — in this case, access to the PIM group — which can optionally be subject to review by a group of “Approvers”, which for the sake of brevity have not been included in this guide.
-
Active: The user will have a role assigned statically; however, it is possible to define an expiration date after which the user will no longer have the privilege specified and managed by PIM — in this case, as above, the assignment to a group with RBAC roles.
You can find more details in the official Microsoft documentation. In the “Setting” section verify that the assignment type is “Eligible”, then click “Assign” to confirm:
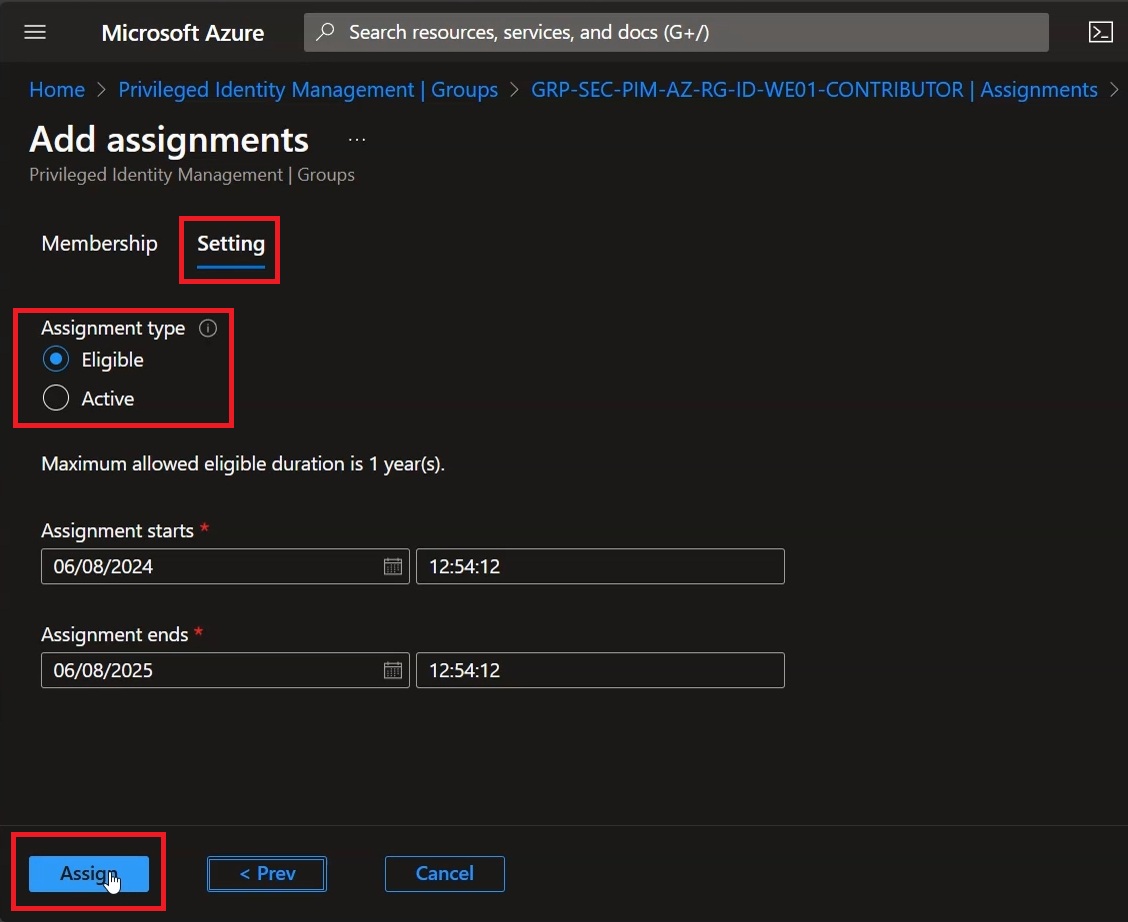
Figure 33: Click “Assign” to confirm the configurations
A pop-up at the top right of the Azure portal will indicate that the operations were successful:
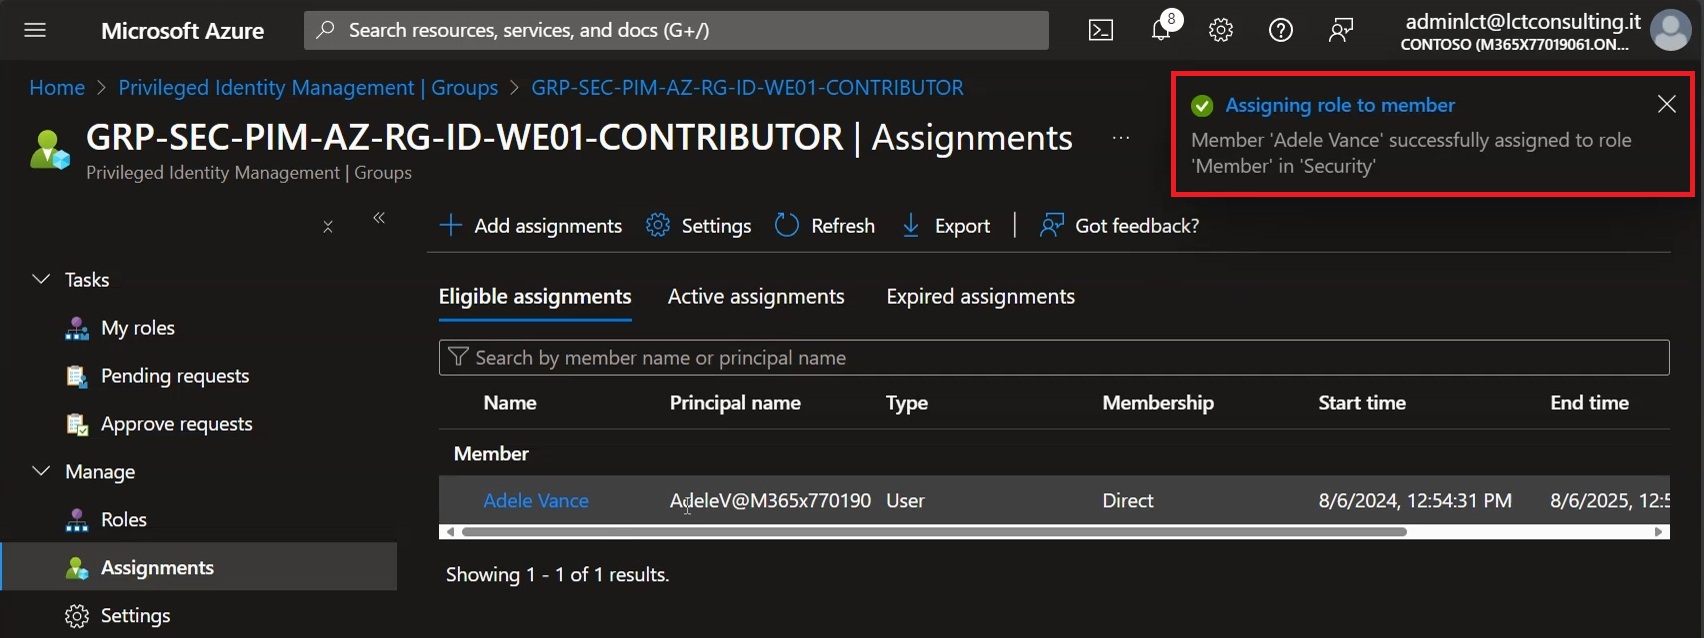
Figure 34: Notification that the privilege has been assigned to the target user
VERIFYING GROUP ACCESS VIA PIM
At this point we need to verify the configurations performed earlier. Now go to “portal.azure.com” in your favorite browser and enter the login of the user to which permissions were assigned via PIM, in this case “Adele Vance”, then select “Next” to continue:
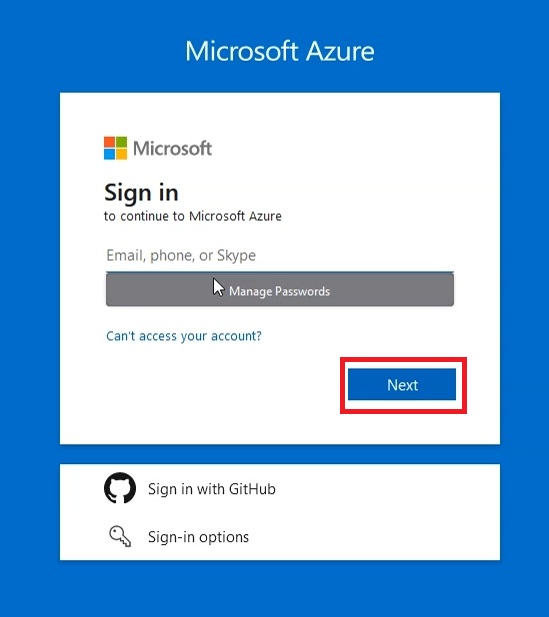
Figure 35: Logging in to the Azure portal with the user managed by PIM
Enter the password, then click “Sign in”:
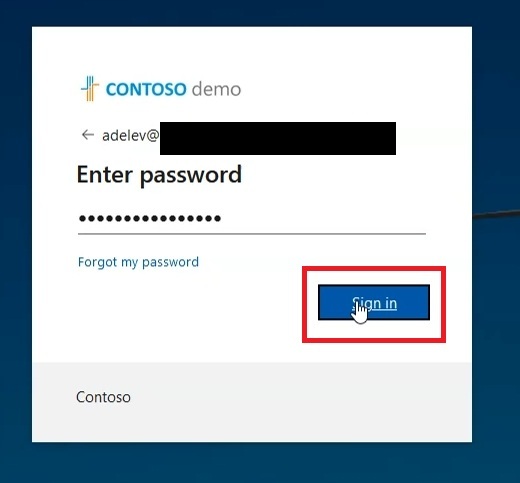
Figure 36: Enter the correct credentials to sign in to the Azure portal
In this case the user is subject to MFA via Conditional Access for access to the Azure portal, so perform the MFA authentication according to the defined methods:
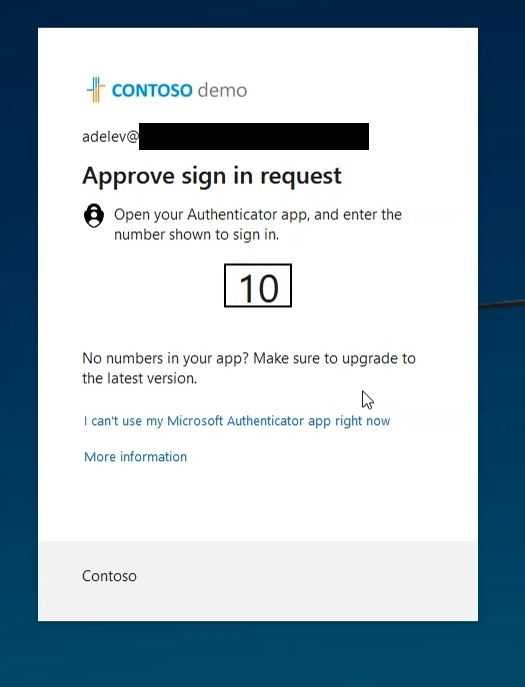
Figure 37: Approve the MFA request to sign in to the Azure portal
Continue the authentication phase by selecting “Yes”:
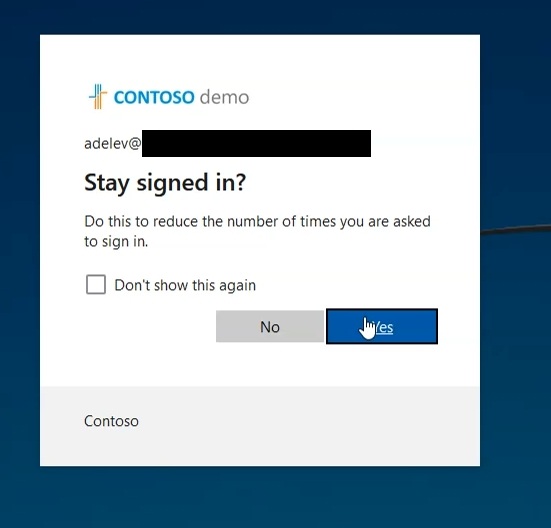
Figure 38: Select “Yes” and proceed with authentication
Once landed in the Azure portal, in the search field, type “Microsoft Entra Privileged Identity Management”, then left-click to enter the section dedicated to PIM:
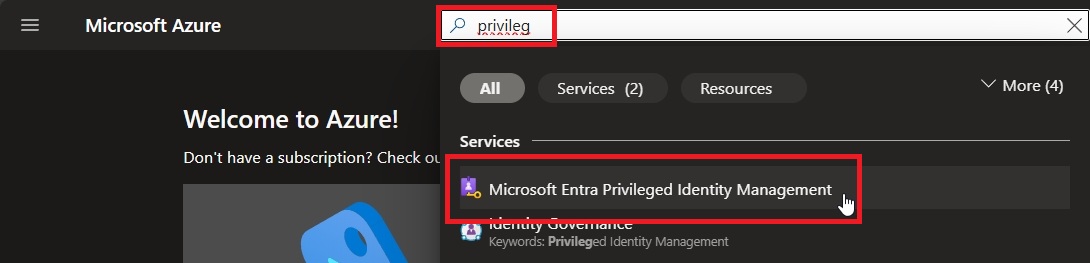
Figure 39: Searching the service name “Microsoft Entra Privileged Identity Management” to access the configuration page
Once on the PIM management page, in the left-hand column click “Groups” to access the section dedicated to the groups managed by PIM:
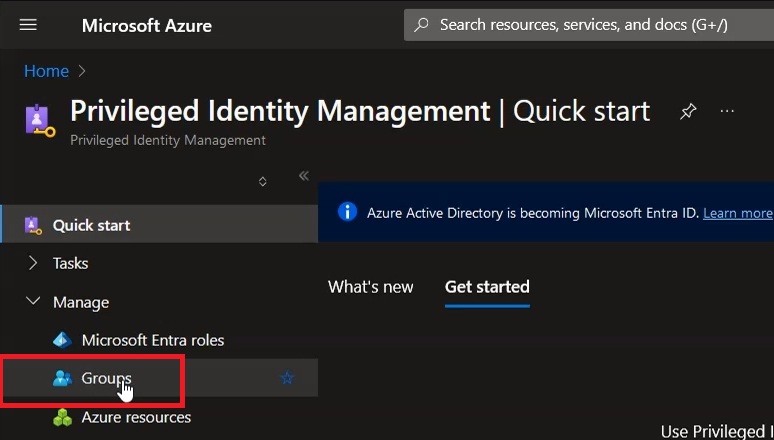
Figure 40: Click “Groups” to enter the management of PIM groups
Select the Entra ID group configured in the previous steps “GRP-SEC-PIM-AZ-RG-ID-WE01-CONTRIBUTOR”:
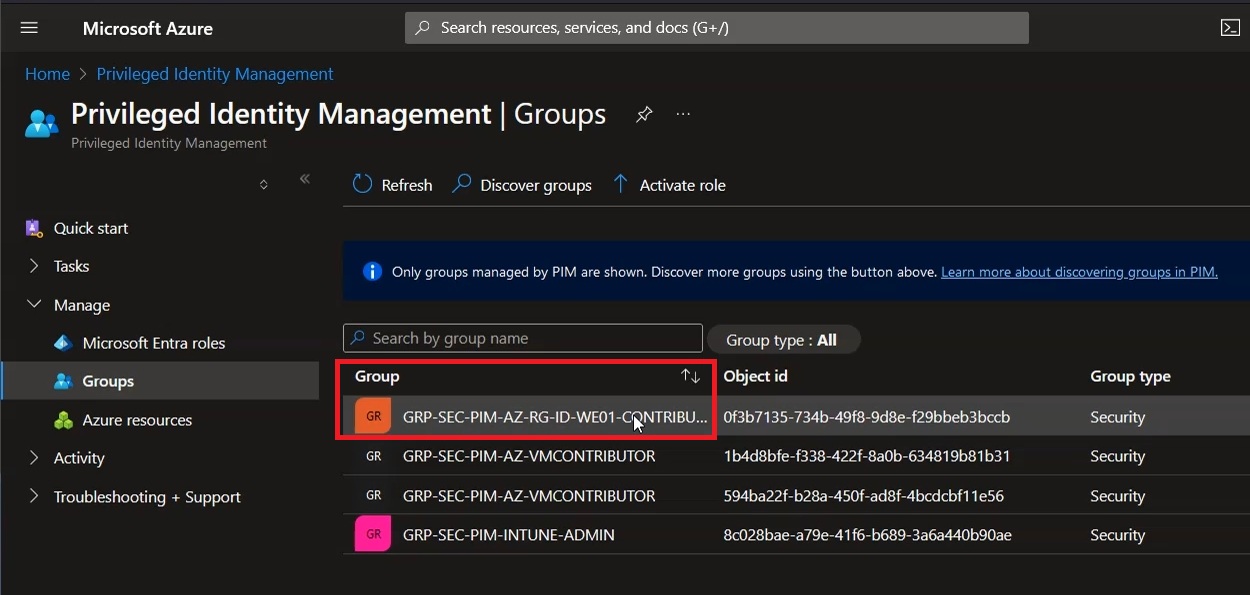
Figure 41: Selecting the PIM group configured earlier
Now you can select “Activate” to start the PIM request that will grant you temporary access to the group:
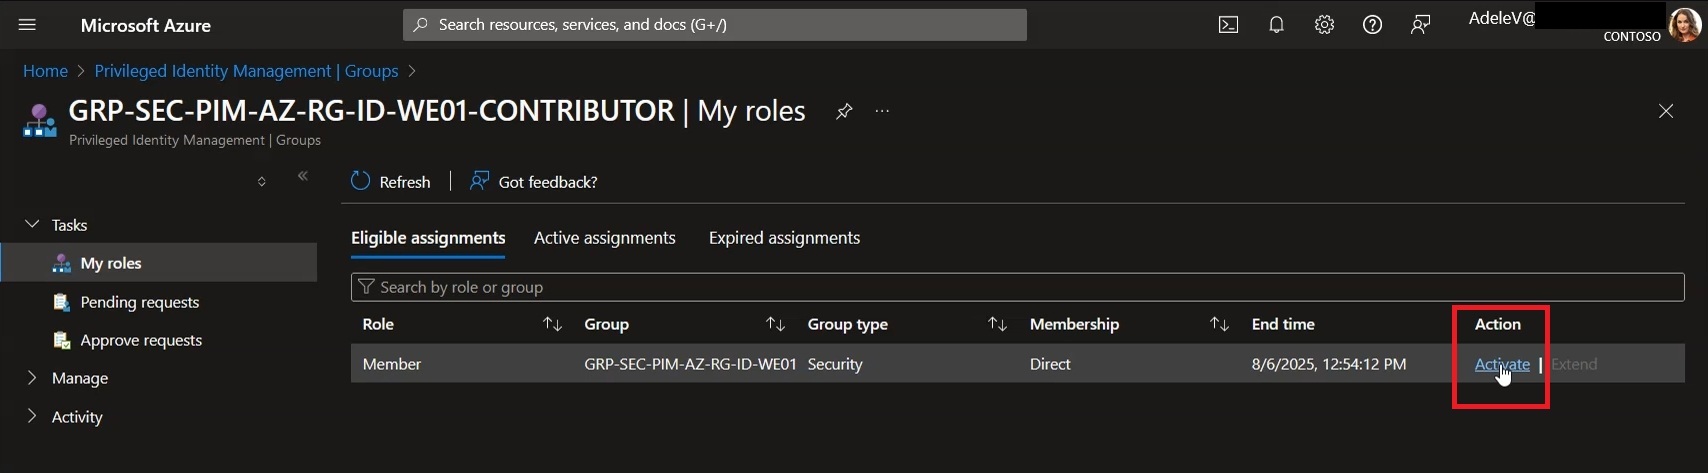
Figure 42: Click “Activate” to start the PIM activation procedure
In the right-hand column that appears immediately afterwards, under “Duration (hours)” select the duration, expressed in hours, during which you will be part of the group, then specify a justification under “Reason” and finally select “Activate” to complete the procedure.
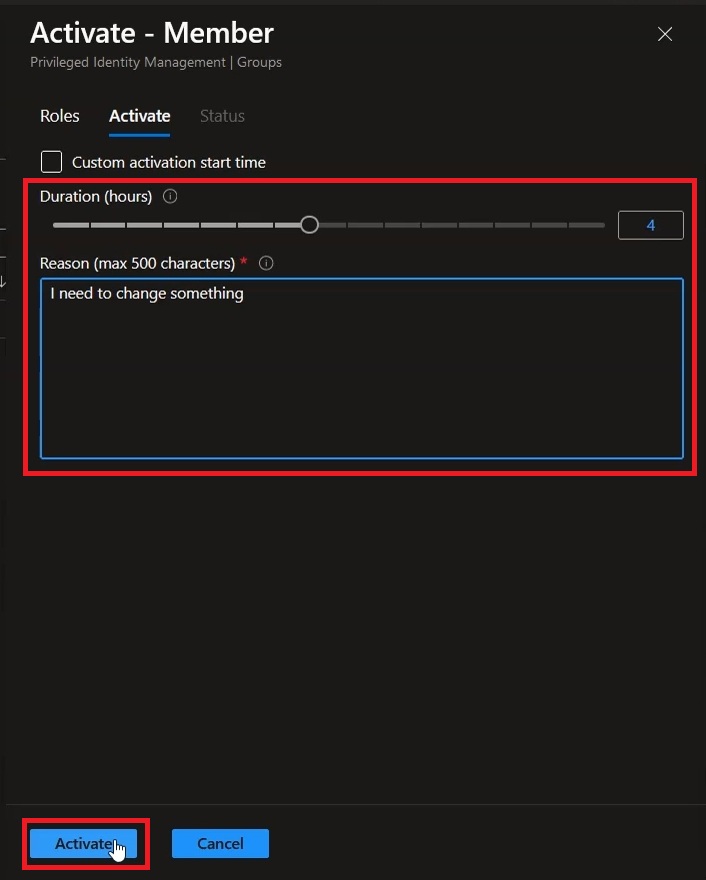
Figure 43: Fill in as shown in the image and select “Activate” to complete the procedure
At this point, since this implementation does not include any Approvers, the procedure will complete the approval process on its own, and within a few seconds the page will refresh, after which the user will be part of the group and will be able to access the resources.
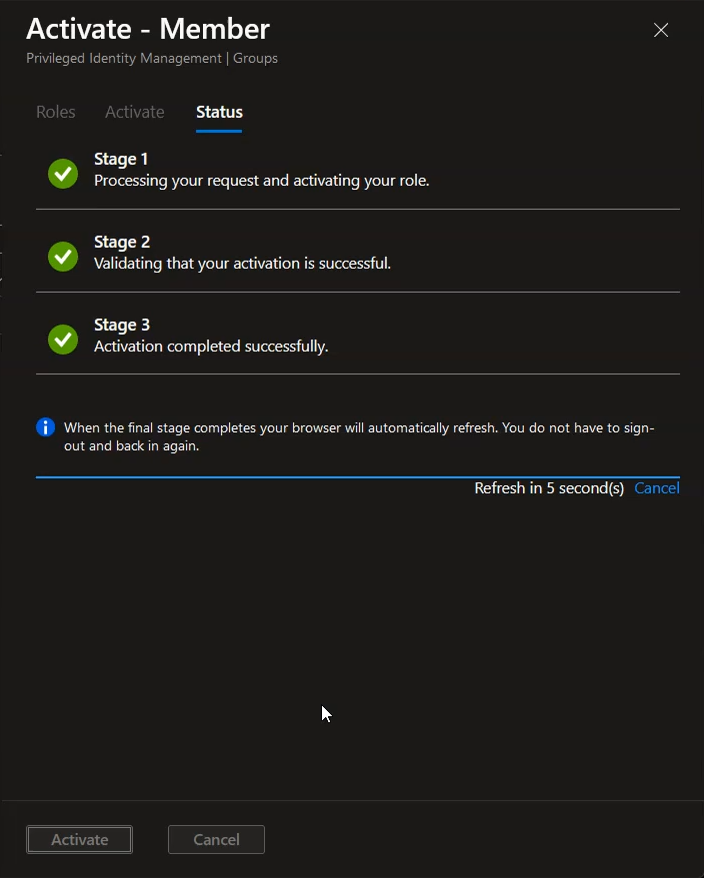
Figure 44: Wait for the process to complete and the resulting page refresh
Now returning to the main page, or simply running a search in the “Search” field at the top of the Azure portal, we can type “Resource Groups” and then select it, to verify which resources have been assigned to us following the PIM request:
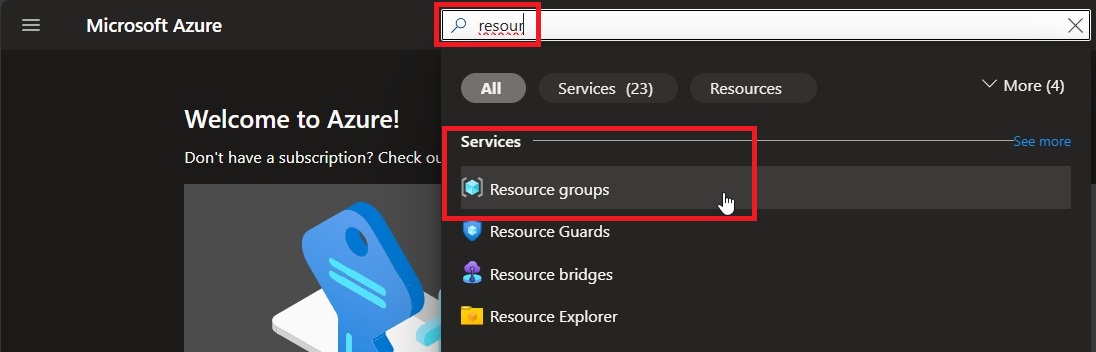
Figure 45: Searching for “Resource Groups” to verify access to resources after activating PIM
As you can see, at this point we have acquired access to the Resource Group “RG-ID-WE01”. You can now select the Resource Group to verify the permissions that have been assigned to us:
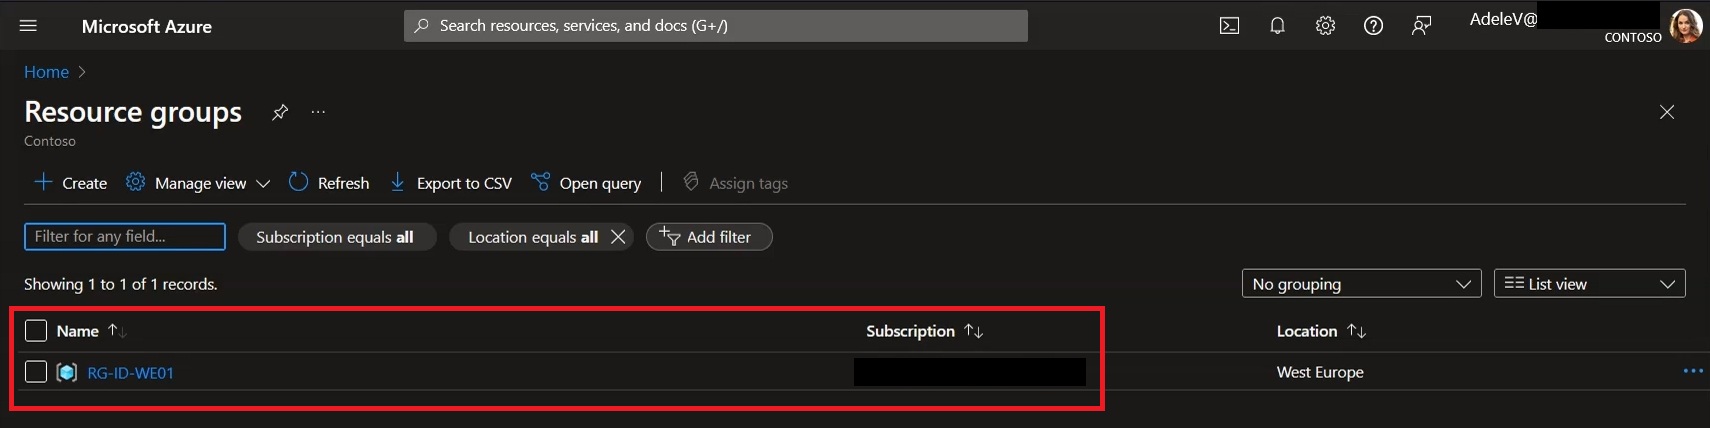
Figure 46: Selecting the Resource Group to verify the assigned permissions
Select “Access control (IAM)” to access the section dedicated to RBAC role assignment.
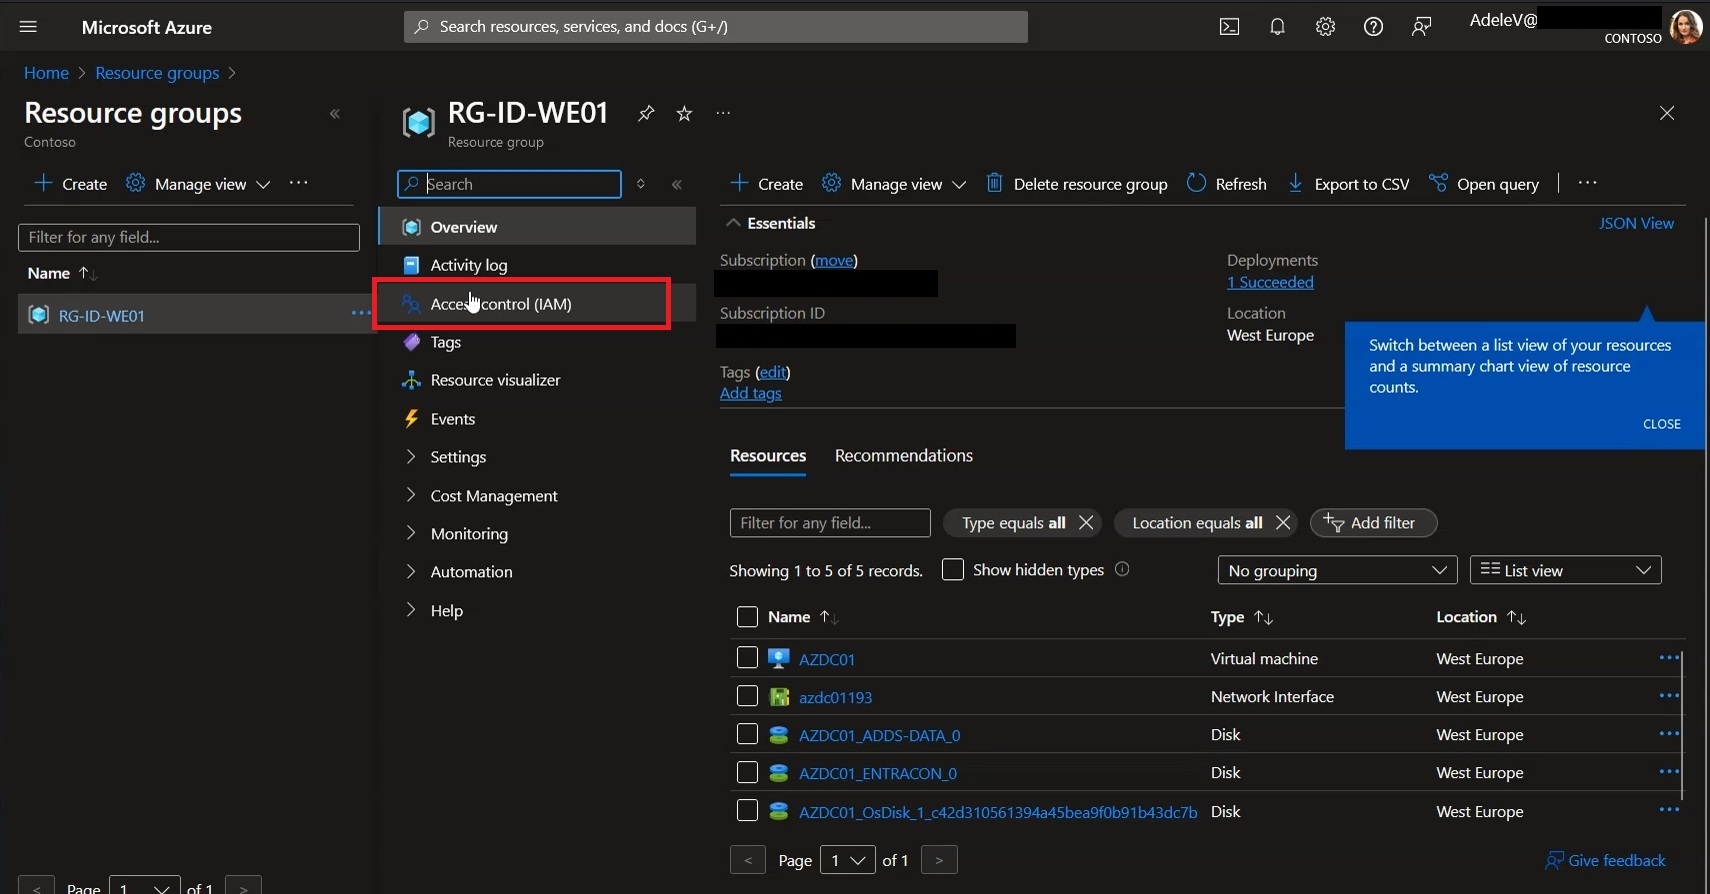
Figure 47: Selecting “Access control (IAM)”
In the “Check access” section select “View my access” to verify the RBAC role present within the Resource Group:
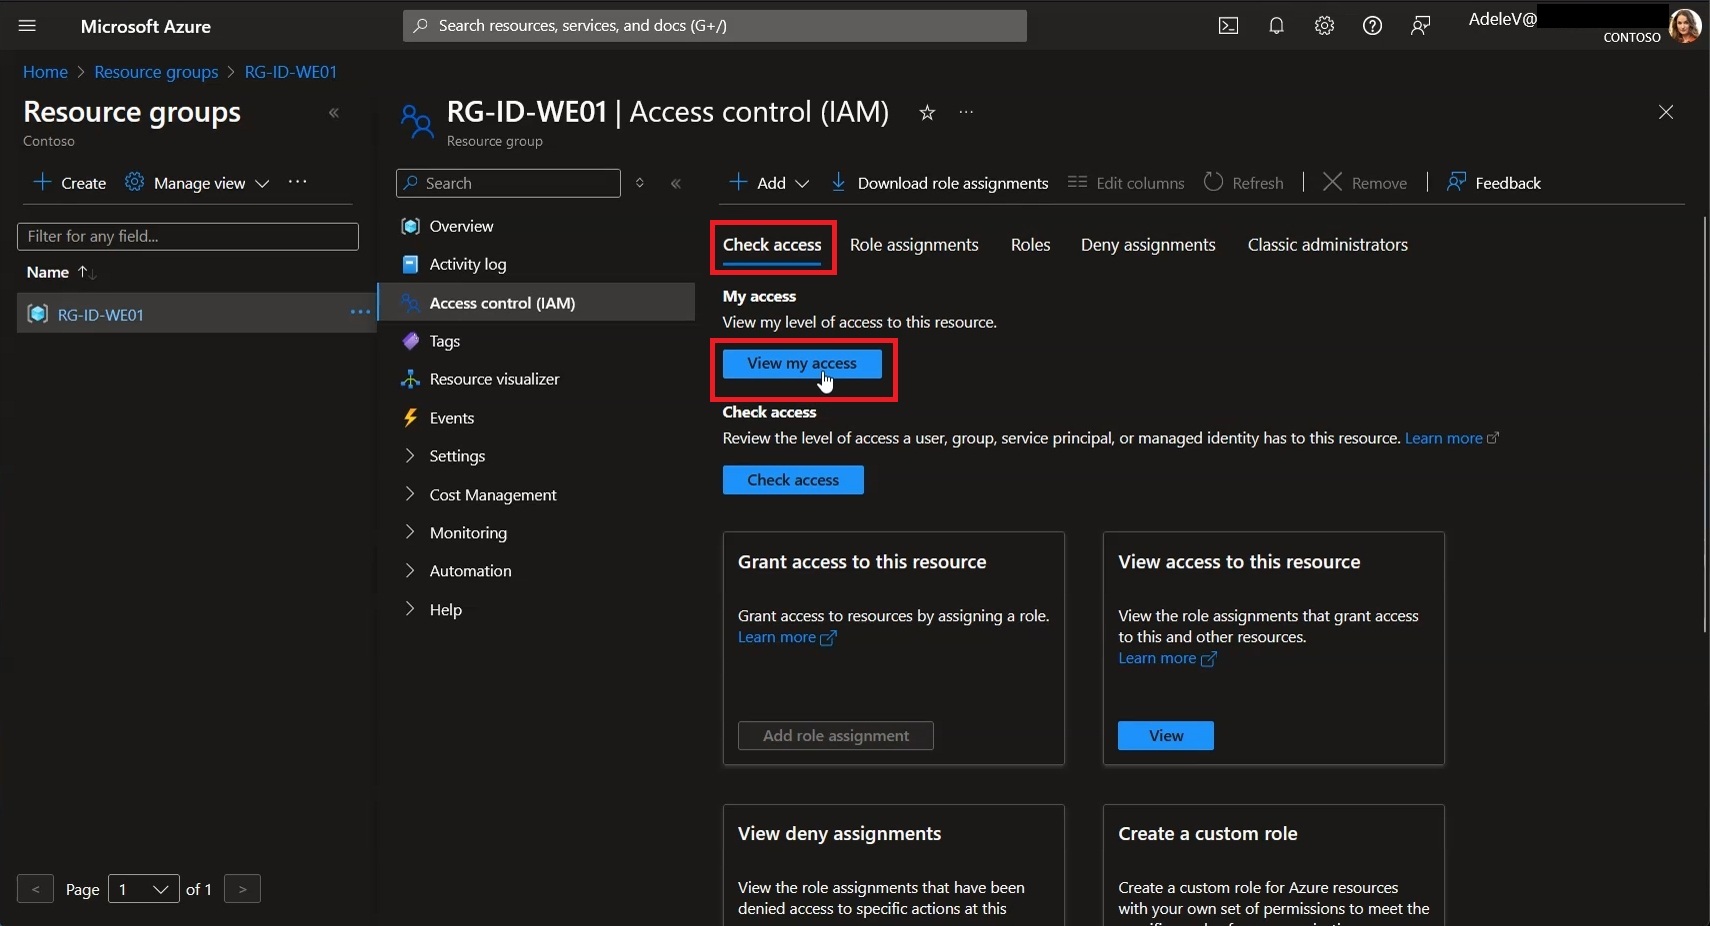
Figure 48: Selecting “View my access” to verify the assigned RBAC role
As you can verify from Figure 49, the user Adele Vance, following the request to join the PIM group “GRP-SEC-PIM-AZ-RG-ID-WE01-CONTRIBUTOR”, received the “Contributor” RBAC role for the entire Resource Group “RG-ID-WE01”
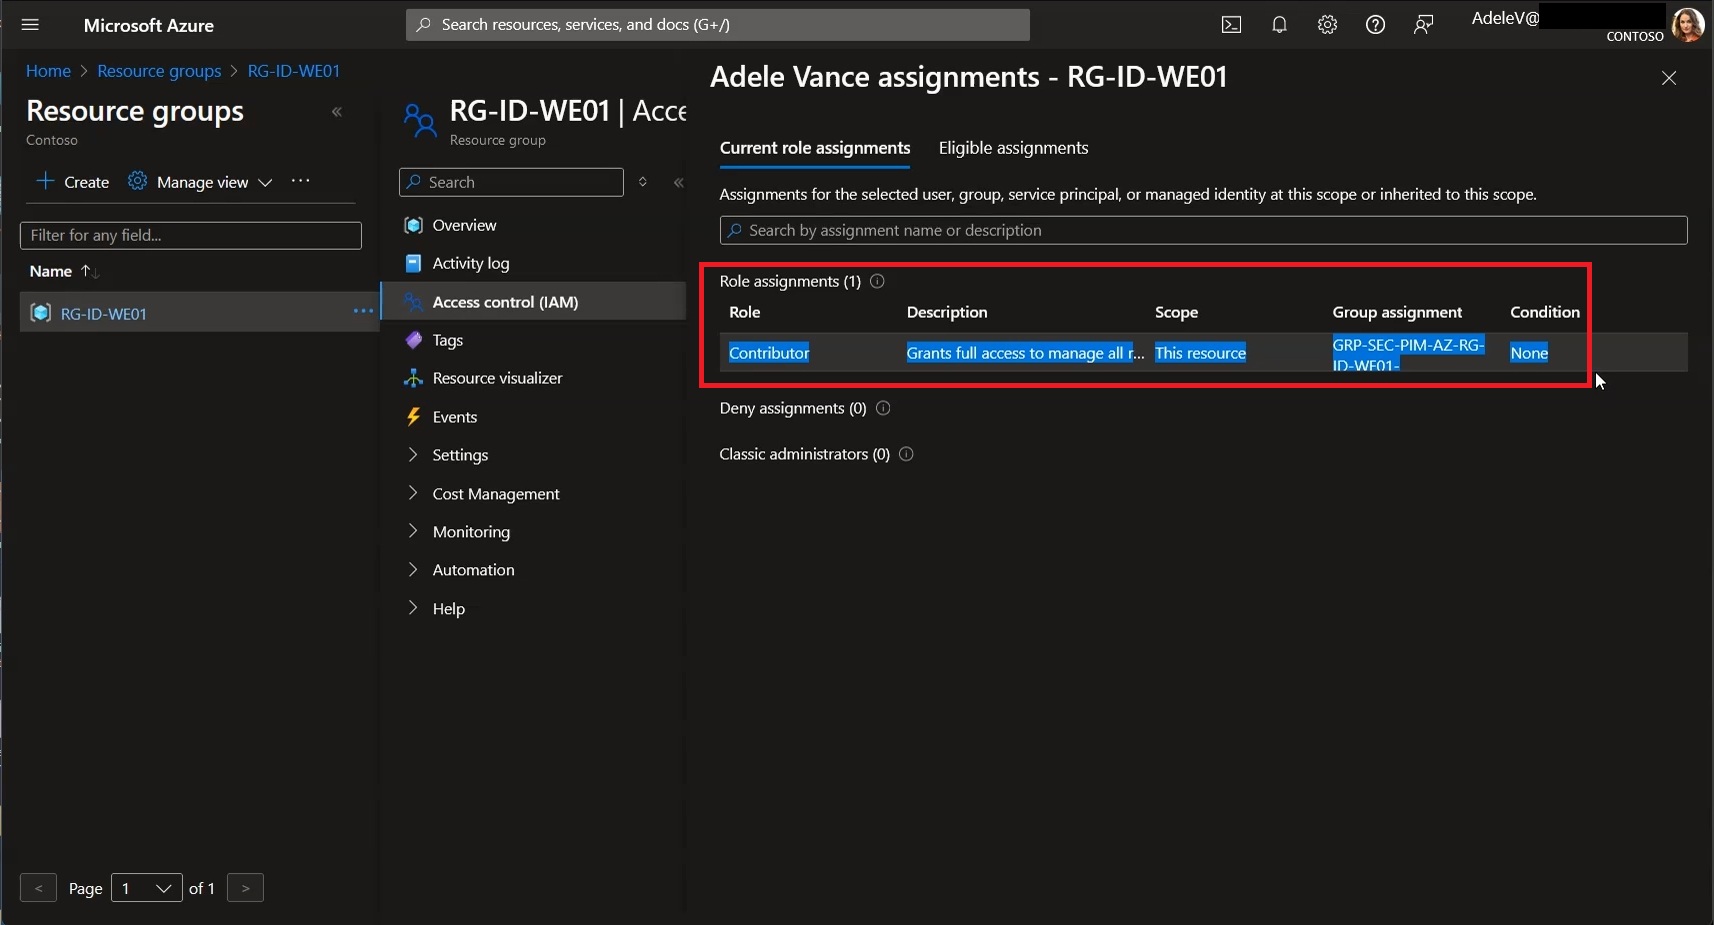
Figure 49: Verifying that the Contributor RBAC role has been correctly assigned to the PIM group
Conclusions
In this guide you will find one possible implementation of PIM, but as you will understand, there are many that can fit your scenarios. What I like about this tool is its simplicity of implementation, which allows you to raise the security level of our cloud infrastructures in just a few clicks. Of course, what is difficult in applying every new technology is the technology gap and the paradigm shift it brings.
However, this should not scare us. As ICT professionals we must drive change according to the methods and timing agreed with the customer, building tailored solutions. In this sense, I believe our mission is to tailor a bespoke suit for the customer — sewing, cutting and adapting the suit to the business requirements.
Another point I would like to touch on in conclusion concerns Microsoft 365 licenses. Now, we all know that every license is hard-won and painstaking, because the topic of costs is always a very hot one for companies, but the real point, in my opinion, is that when we buy a license we have to squeeze the most out of it, implementing the maximum technology available.
It is incredible to see how many tenants have Entra ID Plan 1 but do not have Conditional Access Policies active, or, as in this case, Entra ID P2 tenants that do not use PIM. The concept, I believe, is clear: we have bought a license, with an investment that is sometimes very high, so let’s try to make it deliver the most, using the security of our ICT infrastructures as the compass for our priorities.
Here are some useful links to dig deeper into the topic of PIM:
https://youtu.be/-6mjsfO2saAhttps://www.ictpower.it/guide/configurare-azure-ad-privileged-identity-management.htmhttps://www.ictpower.it/sicurezza/proteggere-laccesso-ad-azure-virtual-desktop-utilizzando-privileged-identity-management.htmhttps://learn.microsoft.com/en-us/entra/id-governance/privileged-identity-management/concept-pim-for-groups